There’s a certain feeling that arrives with the first crisp autumn breeze. It’s a craving, deep in your bones, for something warm, spiced, and comforting. For me, that craving almost always screams “pumpkin pie.”
But let’s be honest. Making a full-sized pumpkin pie is an event. It’s a commitment. You need the perfect pan, the time to let it set, and the pressure of cutting that first perfect slice without destroying the whole thing.
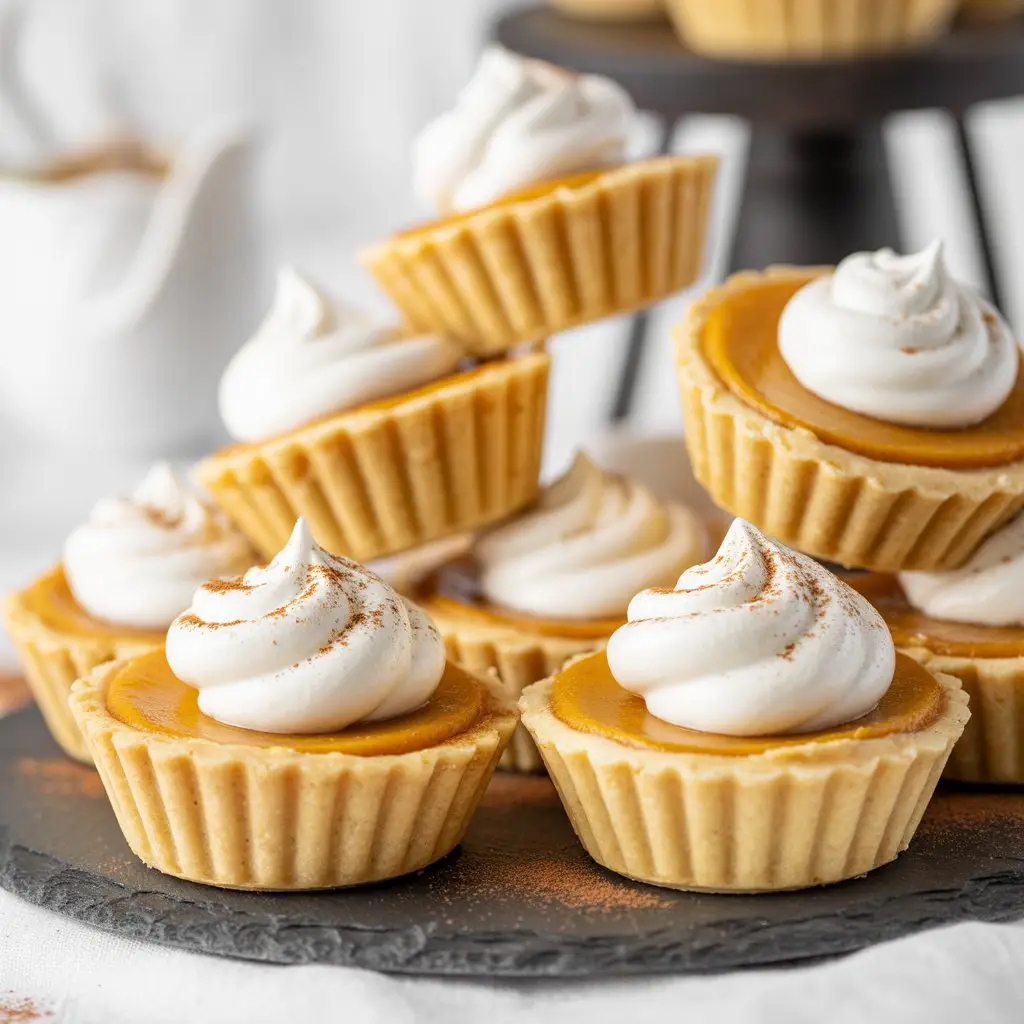
Sometimes you just want the flavor without the fuss. You want a bite-sized piece of autumn you can enjoy with your coffee, bring to a party without needing a serving knife, or sneak from the fridge at midnight. That’s where these little gems come in.
These Pumpkin Pie Bites give you everything you love about the classic dessert in a perfect, poppable package. They’re simple, incredibly delicious, and ready in a fraction of the time. Let’s get baking.
What You’ll Need
Here are the simple ingredients that come together to create these little bites of heaven.
- Refrigerated Pie Crusts: One box (containing 2 crusts) is all you need. This is our shortcut to happiness.
- Pumpkin Puree: One 15-ounce can of 100% pure pumpkin puree, not the pumpkin pie filling. We’re building the flavor ourselves.
- Sweetened Condensed Milk: One 14-ounce can. This gives the filling an unbelievably creamy, smooth, and rich texture.
- Large Egg: Just one to bind the filling together.
- Pumpkin Pie Spice: The heart and soul of our flavor.
- Salt: A small pinch enhances all the other flavors.
- Whipped Cream: For topping, of course. Optional, but is it really?
Tools Required for the Job
No special equipment needed here. You likely have everything in your kitchen already.
- Mini Muffin Tin (24-cup capacity)
- 2.5 to 3-inch Round Cookie or Biscuit Cutter
- Large Mixing Bowl
- Whisk
- Spatula
- Cookie Scoop or Spoon
- Rolling Pin (optional, to smooth out the dough)
Pro Tips for Perfect Pumpkin Pie Bites
I’ve made these more times than I can count. Here are a few hard-earned tips to guarantee your bites are flawless on the very first try.
1. The Secret to a Non-Soggy Crust
Nobody likes a soggy bottom. To avoid this, “dock” your mini pie crusts before filling them. That just means gently poking the bottom of each crust a few times with a fork. This allows steam to escape during baking, keeping the crust crisp and flaky instead of soft and sad.
2. Don’t Overmix the Filling
When you combine the filling ingredients, whisk them just until they’re smooth and uniform. Overmixing whips too much air into the batter. As the bites bake, that air will expand and then collapse as they cool, which is what causes those dreaded cracks on the surface. A gentle hand is key.
3. Let Them Cool Completely (Seriously)
The hardest part of this recipe is waiting. You have to let the bites cool in the muffin tin for about 20-30 minutes before moving them to a wire rack. They are delicate when warm and need this time to firm up. If you try to pop them out too soon, they might fall apart.
How to Make Pumpkin Pie Bites
This process is so simple. Follow these steps for perfect results every time.
Step 1: Prepare Your Oven and Pan
First things first, preheat your oven to 375°F (190°C). While it’s heating up, unroll your refrigerated pie crusts onto a lightly floured surface.
Step 2: Cut and Form the Crusts
Using your round cookie cutter, cut out 12 circles from each pie crust, for a total of 24. If you run out of space, just gently re-roll the scraps.
Gently press each dough circle into a cup of your mini muffin tin. Use your fingers to press the dough evenly along the bottom and up the sides. Then, use a fork to dock the bottom of each crust.
Step 3: Mix the Filling
In a large bowl, combine the pumpkin puree, sweetened condensed milk, egg, pumpkin pie spice, and salt. Whisk everything together until it’s just combined and smooth. Remember the pro tip: don’t overdo it!
Step 4: Fill and Bake
Use a small cookie scoop or a spoon to carefully portion the filling into each mini pie crust. Fill them up almost to the top.
Place the muffin tin in the preheated oven and bake for 18-22 minutes. The filling should be set, and a toothpick inserted into the center should come out clean.
Step 5: Cool and Serve
Let the pumpkin pie bites cool in the muffin tin for at least 20 minutes. After they’ve had time to set, you can gently remove them and place them on a wire rack to cool completely. Once cool, top with a dollop of whipped cream and a sprinkle of extra pumpkin pie spice before serving.
Substitutions and Variations
Want to mix things up? This recipe is very forgiving. Here are some ideas.
| Ingredient | Substitution/Variation | Notes |
|---|---|---|
| Pie Crust | Gluten-Free Pie Crust | Follow the package directions for your GF crust. |
| Pie Crust | Gingersnap Crust | Crush gingersnaps, mix with melted butter, and press into the tin. |
| Sweetened Condensed Milk | Coconut Condensed Milk | A great dairy-free option that adds a subtle coconut flavor. |
| Pumpkin Pie Spice | DIY Spice Blend | Mix cinnamon, nutmeg, ginger, and a pinch of cloves. |
Make-Ahead Tips
If you’re planning for a party, you can easily prep these ahead of time. The filling can be mixed together and stored in an airtight container in the refrigerator for up to 2 days.
You can also form the mini crusts in the muffin tin, cover it tightly with plastic wrap, and refrigerate for up to 24 hours before filling and baking.
More Than Just a Dessert
These bites are versatile. Here’s a little more info to help you fit them into your life.
Nutritional Breakdown (Estimated)
This is an approximation per bite, as brands can vary. It’s a treat, so enjoy it!
| Nutrient | Amount per Bite |
|---|---|
| Calories | ~95 kcal |
| Carbohydrates | ~12g |
| Fat | ~5g |
| Protein | ~2g |
Dietary Swaps
For a gluten-free version, simply use your favorite store-bought gluten-free pie crust. For a dairy-free or vegan option, use a vegan pie crust, swap the sweetened condensed milk for the coconut-based version, and use a flax egg (1 tbsp ground flaxseed mixed with 3 tbsp water) in place of the regular egg.
Pairing Suggestions
These are perfect with a hot cup of coffee or a chai latte. For an after-dinner treat, a small scoop of vanilla bean ice cream on the side is pure perfection.
Cooking Time Efficiency
While the oven preheats, get your crusts cut and pressed into the pan. While they bake, you can wash the mixing bowl and utensils. Small steps save a lot of time!
Leftovers and Storage
If you somehow have leftovers, storing them is easy. Place the cooled bites in a single layer in an airtight container.
They will keep in the refrigerator for up to 4 days. I find they taste even better the next day as the flavors have more time to meld. They are delicious served chilled, straight from the fridge.
Frequently Asked Questions (FAQ)
Q1. My filling cracked on top. What did I do wrong?
Ans: This usually happens for one of two reasons: overmixing the filling (which adds too much air) or overbaking. Mix the filling just until combined, and pull the bites from the oven as soon as a toothpick comes out clean. A tiny crack is fine, especially since you’ll be covering it with whipped cream!
Q2. Can I use fresh pumpkin puree instead of canned?
Ans: You can, but it requires an extra step. Fresh pumpkin puree has a much higher water content. You’ll need to cook it down on the stove first to thicken it, or strain it through a cheesecloth. Otherwise, your filling will be too watery. For consistency and ease, canned is usually the best bet.
Q3. How do I know when they’re perfectly baked?
Ans: The filling should look set and not jiggly in the center. The very middle might have a slight wobble, but it shouldn’t look liquidy. The toothpick test is your best friend here—if it comes out with just a few moist crumbs (but no wet batter), they’re ready.
Q4. Can I make these without a mini muffin tin?
Ans: You could use a standard-sized muffin tin to make larger, tart-sized versions. You’ll need to cut larger circles of dough (around 4 inches) and increase the baking time to 25-30 minutes. You’ll get about 12 larger tarts instead of 24 bites.
Wrapping Up
And there you have it—the perfect solution to your pumpkin pie craving, without any of the usual hassle. These little bites are a joy to make and even more of a joy to share.
They’re proof that sometimes, the best things really do come in small packages. I hope you give this recipe a try and that it brings a little bit of autumn happiness into your kitchen.
If you make them, I’d love to hear about it! Drop a comment below and let me know how they turned out, or if you discovered any fun variations of your own.