There are certain smells that just feel like a hug for your soul. Freshly cut grass, old books, and for me, the nutty, toasty aroma of butter browning in a pan.
It’s a smell that instantly transforms my kitchen from a place of chores into a creative sanctuary. For years, I thought blondies were just… fine. A simple, sweet bar that was nice, but not a showstopper.
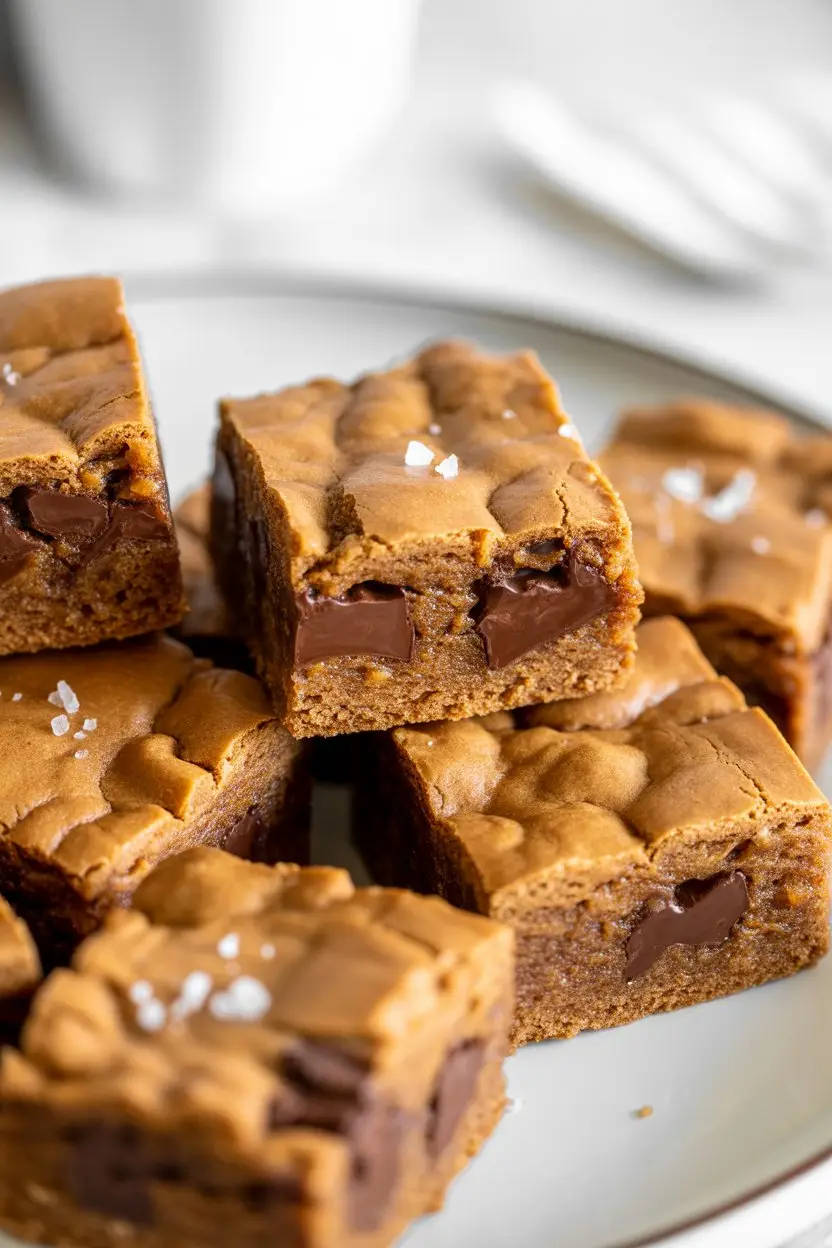
Then I tried browning the butter first. It was a complete game-changer. That one extra step elevates a simple recipe into something deeply flavorful, rich, and utterly addictive. These aren’t just blondies; they’re an experience.
They have crispy, crackly edges that give way to a ridiculously fudgy and chewy center, all packed with the caramel and nutty notes of browned butter. Let’s make something amazing together.
What You’ll Need
This recipe uses pantry staples, but the magic is in the technique. The star is the butter, so use a good quality one if you can.
- Unsalted Butter: The foundation of our flavor. We’ll be browning it to unlock its magic.
- Light Brown Sugar: Provides moisture, chewiness, and a lovely caramel flavor.
- Granulated Sugar: Adds sweetness and helps create those coveted crispy edges.
- Eggs: One whole egg and one egg yolk for the perfect fudgy texture.
- Vanilla Extract: A splash of pure vanilla extract complements the butter beautifully.
- All-Purpose Flour: Gives the blondies their structure.
- Cornstarch: A secret weapon for a tender, soft interior.
- Baking Powder: Provides just a little bit of lift.
- Salt: Crucial for balancing all the sweetness.
- Chocolate Chips: Semi-sweet or dark chocolate chunks work best to offset the sweetness.
Pro Tips
I’ve made my fair share of duds to get to this perfect recipe. Here are a few things I learned along the way that will help you nail it on the first try.
- Watch The Butter Like a Hawk: Browning butter can go from gorgeously nutty to tragically burnt in a matter of seconds. Stay by the stove, swirl the pan constantly, and watch for the brown bits (milk solids) to turn a perfect amber color. The second you smell that nutty aroma, take it off the heat.
- Don’t Overmix the Flour: Once you add the dry ingredients, mix only until you no longer see streaks of flour. Overmixing develops gluten, which will lead to a tough, cakey blondie instead of a soft, fudgy one. Gently does it.
- The Underbake is Crucial: This is the secret to a gooey center. Bake until the edges are set and golden, but the middle still looks a little soft and underdone. A toothpick inserted in the center should come out with moist crumbs, not clean. The blondies will continue to cook and set in the hot pan as they cool.
- Patience is a Virtue (Especially for Cooling): I know it’s tempting to slice into them the moment they leave the oven. Please resist! Letting the blondies cool completely in the pan is essential. This allows the center to set, making them fudgy and easy to cut into clean squares. An hour is good, two is even better.
Required Tools
You don’t need any fancy gadgets for this recipe, just some basic baking equipment.
- Light-colored saucepan
- Whisk
- Large mixing bowl
- Silicone spatula
- 8×8 inch baking pan
- Parchment paper
- Measuring cups and spoons
Substitutions and Variations
One of the best things about blondies is how easy they are to customize. Here are a few ideas to get you started.
| Ingredient | Substitution Idea | Notes |
|---|---|---|
| Light Brown Sugar | Dark Brown Sugar | Creates a deeper molasses flavor. |
| All-Purpose Flour | 1:1 Gluten-Free Flour | Use a blend with xanthan gum. |
| Chocolate Chips | Nuts, other chips | Try pecans, walnuts, or butterscotch chips. |
For a salty-sweet kick, sprinkle a little flaky sea salt over the top right after they come out of the oven. It’s a simple touch that makes a huge difference.
Make-Ahead Tips
These blondies are a great treat to prep in advance.
You can prepare the blondie batter, cover it tightly, and refrigerate it for up to 3 days. When you’re ready to bake, just press it into your prepared pan and add a few extra minutes to the baking time.
How to Make Browned Butter Blondies: Step-by-Step
Ready to fill your kitchen with the best smell on earth? Let’s get started.
Step 1: Preheat your oven to 350°F (175°C). Line an 8×8 inch baking pan with parchment paper, leaving some overhang on the sides to use as handles later.
Step 2: In a light-colored saucepan, melt the butter over medium heat. Continue cooking, swirling the pan occasionally, until the butter foams, then subsides. You’ll see little brown bits form at the bottom and smell a nutty aroma. This takes about 5-8 minutes. Immediately remove from heat and pour into a large mixing bowl to stop the cooking.
Step 3: Add the light brown sugar and granulated sugar to the hot browned butter. Whisk vigorously for about a minute until the mixture is smooth and combined.
Step 4: Whisk in the egg, egg yolk, and vanilla extract until the batter is glossy and smooth.
Step 5: In a separate small bowl, whisk together the flour, cornstarch, baking powder, and salt. Add the dry ingredients to the wet ingredients and fold them in with a spatula until just combined. Do not overmix.
Step 6: Gently stir in the chocolate chips.
Step 7: Pour the batter into your prepared baking pan and use the spatula to spread it into an even layer.
Step 8: Bake for 22-26 minutes. The edges should be golden brown and the center should look slightly soft. Let the blondies cool completely in the pan on a wire rack before lifting them out with the parchment paper and cutting them into squares.
Nutritional Info, Pairings, and Tips
Here’s a little more information to help you enjoy your blondies to the fullest.
Dietary Swaps
Making treats for friends with different dietary needs? No problem.
| Dietary Need | Easy Swap |
|---|---|
| Gluten-Free | Use a 1-to-1 gluten-free baking flour blend. |
| Dairy-Free / Vegan | Use vegan butter sticks and two “flax eggs” (2 tbsp ground flaxseed + 5 tbsp water). |
Serving Suggestions
These blondies are fantastic on their own, but they are even better when paired with:
- A tall, cold glass of milk.
- A hot cup of coffee or tea.
- A scoop of vanilla bean ice cream for a decadent dessert.
Cooking Time Efficiency
To make the process smoother, measure out all your other ingredients while the butter is browning. This way, everything is ready to go, and you can assemble the batter quickly once the butter is done.
Nutritional Information (Estimate)
Please note that this is an approximation. The actual values will vary based on the specific ingredients you use.
| Nutrition (per blondie, 16 servings) | Amount |
|---|---|
| Calories | ~180 kcal |
| Fat | ~10g |
| Carbohydrates | ~22g |
| Protein | ~2g |
Leftovers and Storage
If you somehow have leftovers, they store very well.
Store the blondies in an airtight container at room temperature for up to 4 days. If you want to keep them longer, you can store them in the fridge for up to a week. They also freeze beautifully for up to 3 months.
Frequently Asked Questions
Q1. My blondies came out cakey instead of fudgy. What did I do wrong?
Ans: This is a common issue! It usually happens for one of two reasons: you overmixed the batter after adding the flour, or you overbaked them. Mix just until the flour disappears and pull them from the oven when the center is still a bit soft.
Q2. Can I double this recipe?
Ans: Absolutely. Just double all the ingredients and bake it in a 9×13 inch pan. You will need to increase the baking time by about 5-10 minutes, so keep an eye on it.
Q3. My browned butter has black specks instead of brown ones. Is it ruined?
Ans: Unfortunately, yes. Black specks mean the milk solids have burned, and the butter will have a bitter, unpleasant taste. It’s best to discard it and start over. Using a light-colored pan helps you see the color change more clearly.
Q4. Can I use salted butter instead of unsalted?
Ans: You can, but you should reduce the added salt in the recipe to about 1/4 teaspoon. Unsalted butter gives you more control over the final saltiness of the blondies.
Wrapping Up
There you have it. A simple recipe that delivers incredibly complex and satisfying flavor. The depth from the browned butter truly makes these blondies stand out from the crowd.
I hope you give this recipe a try and that the smell of browned butter fills your home and brings a smile to your face. It’s a small effort for a huge reward.
If you make them, I’d love to hear how they turned out! Please leave a comment below with your experience or any questions you might have.