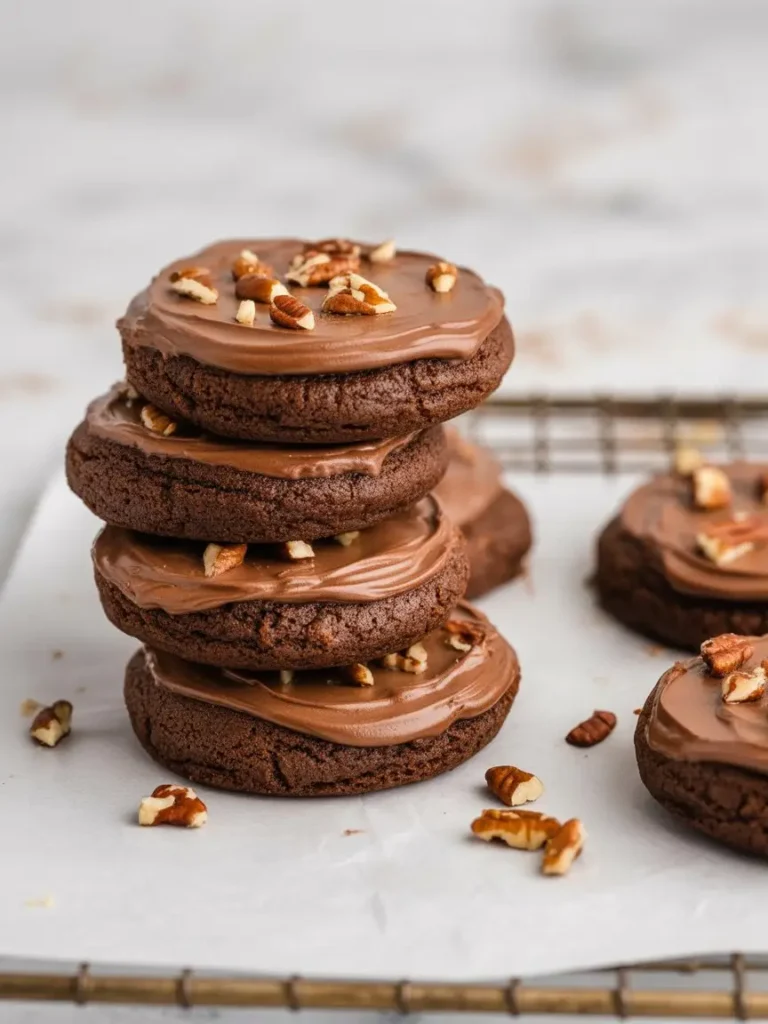
I have a vivid memory of being a kid and carefully negotiating a trade in the school cafeteria. The prize? A pack of Nutter Butter cookies. There was just something magical about that crunchy, peanut-shaped cookie filled with creamy, sweet peanut butter goodness. It was the undisputed king of lunchbox snacks.
For years, I’d grab a pack from the store whenever a craving hit. But then I had a thought: could I make them at home? Not just make them, but make them better? The answer is a resounding yes. These homemade Nutter Butters have all the nostalgia of the original, but with a richer peanut butter flavor and a perfect texture that only comes from a fresh-baked cookie.
They’re surprisingly simple to whip up, and the process of shaping the little peanuts is half the fun. Get ready to create a new favorite snack that will blow the store-bought version out of the water.
What You’ll Need
This recipe uses simple, common pantry staples. The key is good quality peanut butter for the best flavor!
For the Peanut Butter Cookies:
- 1 cup all-purpose flour
- 1/2 cup creamy peanut butter
- 1/2 cup unsalted butter, softened
- 1/3 cup granulated sugar
- 1/3 cup packed light brown sugar
- 1 large egg
- 1/2 teaspoon baking soda
- 1/4 teaspoon baking powder
- 1/4 teaspoon salt
For the Peanut Butter Filling:
- 1 cup powdered sugar
- 1/2 cup creamy peanut butter
- 2-3 tablespoons milk or heavy cream
- 1/2 teaspoon vanilla extract
Pro Tips
After a few batches, I’ve learned some tricks that make these cookies turn out perfectly every single time. Don’t skip these!
- Chill The Dough. Seriously. This is the most important step. Chilling the dough for at least an hour makes it firm and much easier to handle. It prevents the cookies from spreading into flat, sad circles in the oven.
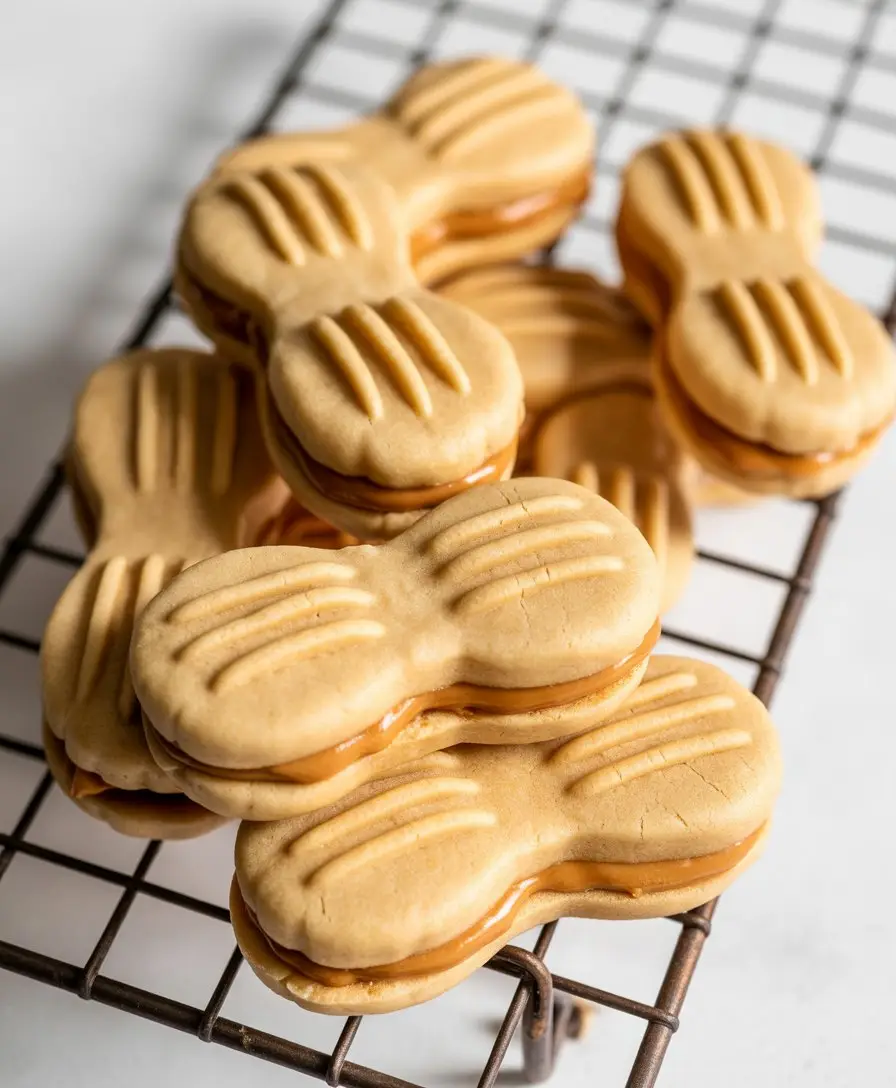
- The Perfect Shape. Don’t stress about making them look exactly like the packaged version. Roll about a tablespoon of dough into a small log, then gently pinch the middle to create that classic peanut shape. It’s rustic charm!
- Don’t Overbake. Pull the cookies from the oven when the edges are just starting to turn golden brown. They will look slightly underdone in the center. They’ll continue to bake on the hot pan and will firm up to the perfect chewy-crisp texture as they cool.
- Sift Your Powdered Sugar. For the smoothest, creamiest filling, run your powdered sugar through a fine-mesh sieve before mixing. This breaks up any clumps and guarantees a silky texture without any grittiness.
Tools Required
You don’t need any fancy equipment for this recipe. Here are the basics you’ll want to have on hand.
| Tool | Purpose |
|---|---|
| Electric Mixer | For creaming butter and sugar. |
| Baking Sheets | You’ll need at least two. |
| Parchment Paper | Prevents sticking and helps with cleanup. |
| Mixing Bowls | One large for dough, one medium for filling. |
| Fork | For creating the classic crisscross pattern. |
Substitutions and Variations
Want to mix things up? Here are a few ideas to get you started.
- Gluten-Free Nutter Butters: Swap the all-purpose flour with a good quality 1-to-1 gluten-free baking flour blend. Look for one that contains xanthan gum.
- Crunchy Peanut Butter: Feel free to use crunchy peanut butter in the cookie dough for extra texture. I’d stick with creamy for the filling to keep it smooth.
- Chocolate Dipped: After assembling the cookies, melt some semi-sweet chocolate chips and dip half of each cookie into the chocolate. Let them set on parchment paper.
- Different Nut Butters: While it won’t be a “Nutter Butter,” you could experiment with almond butter or cashew butter for a different nutty flavor profile.
How to Make Copycat Nutter Butter Cookies
This is a two-part process: making the cookies, then making the filling. It’s easy, so let’s get started.
Part 1: The Cookies
Step 1: In a medium bowl, whisk together the flour, baking soda, baking powder, and salt. Set it aside.
Step 2: In a large bowl using a hand mixer or stand mixer, beat the softened butter, creamy peanut butter, granulated sugar, and brown sugar on medium speed until light and fluffy, about 2-3 minutes.
Step 3: Beat in the egg until just combined. Scrape down the sides of the bowl as needed.
Step 4: With the mixer on low, gradually add the dry ingredients to the wet ingredients, mixing until just combined. Do not overmix.
Step 5: Cover the bowl with plastic wrap and chill the dough in the refrigerator for at least 1 hour, or up to 3 days.
Step 6: Preheat your oven to 375°F (190°C). Line two baking sheets with parchment paper.
Step 7: Take about 1 tablespoon of dough and roll it into a small log (about 2 inches long). Gently pinch the center to create a peanut shape. Place it on the prepared baking sheet.
Step 8: Repeat with the remaining dough, placing the cookies about 2 inches apart. Use a fork to gently press a crisscross pattern onto each cookie, flattening it slightly.
Step 9: Bake for 9-11 minutes, or until the edges are lightly golden. Let them cool on the baking sheet for 5 minutes before transferring to a wire rack to cool completely.
Part 2: The Filling & Assembly
Step 1: While the cookies are cooling, prepare the filling. In a medium bowl, beat the peanut butter and powdered sugar together with an electric mixer until combined. It will be thick and crumbly.
Step 2: Add the vanilla extract and 2 tablespoons of milk. Beat on low speed to combine, then increase to medium-high and beat until the filling is smooth and creamy. If it’s too thick, add the remaining tablespoon of milk.
Step 3: Find matching cookie pairs. Spread about 1-2 teaspoons of filling on the flat side of one cookie, then gently press another cookie on top to create a sandwich. Repeat with the remaining cookies.
Dietary Swaps & Nutritional Info
Here’s a quick look at the nutritional estimates and how you can adjust for different dietary needs. Note that values are estimates and will vary based on exact ingredients used.
| Nutrition (Per Cookie) | Estimate | Dietary Swap |
|---|---|---|
| Calories | ~150 kcal | Use a sugar substitute like erythritol. |
| Fat | ~8g | Use a reduced-fat peanut butter. |
| Carbohydrates | ~16g | Use a keto-friendly flour blend. |
| Protein | ~3g | Add a scoop of unflavored protein powder. |
Leftovers and Storage
If you somehow have any leftovers, here’s the best way to store them.
Store the assembled cookies in an airtight container at room temperature for up to 5 days. The cookies will soften slightly over time as they absorb moisture from the filling, which many people actually prefer!
For longer storage, you can freeze the assembled cookies. Place them in a single layer on a baking sheet to flash-freeze for 30 minutes, then transfer them to a freezer-safe bag or container. They’ll keep for up to 3 months. Thaw at room temperature before enjoying.
Frequently Asked Questions
Q1. Why did my cookies spread so much?
Ans: The most common reason is that the dough wasn’t chilled long enough. Chilling solidifies the fat, which helps the cookies hold their shape during baking. Also, make sure your butter was softened, not melted.
Q2. Can I use natural peanut butter?
Ans: You can, but it may change the texture. Natural peanut butters often have more oil separation. This can make the dough a bit greasier and the cookies more crumbly. If you use it, be sure to stir it very, very well first.
Q3. My filling is too stiff/runny. How do I fix it?
Ans: This is an easy fix! If the filling is too stiff, add milk one teaspoon at a time until it reaches a smooth, spreadable consistency. If it’s too runny, add more powdered sugar, a tablespoon at a time, until it thickens up.
Q4. Do I have to make the crisscross pattern?
Ans: Nope! That’s just for the classic look. You can leave them smooth or press them down gently with the bottom of a glass. The pattern does help flatten them to an even thickness for baking, though.
Wrapping Up
There you have it – a nostalgic childhood treat made even better right in your own kitchen. These Copycat Nutter Butter Cookies are a true delight, packed with so much peanut butter flavor that you’ll never look at the store-bought package the same way again.
I really hope you give this recipe a try. It’s a fun baking project that yields incredibly delicious results. If you do make them, please leave a comment below and let me know how they turned out. I love hearing about your kitchen adventures!