I remember standing in my kitchen, staring at a block of cream cheese and a carton of raspberries. Guests were coming in two hours, and I had promised a dessert. Panic started to set in.
I needed something fast, something that looked impressive, but didn’t require me to turn on the oven in the middle of July. That’s when this recipe was born out of sheer necessity.
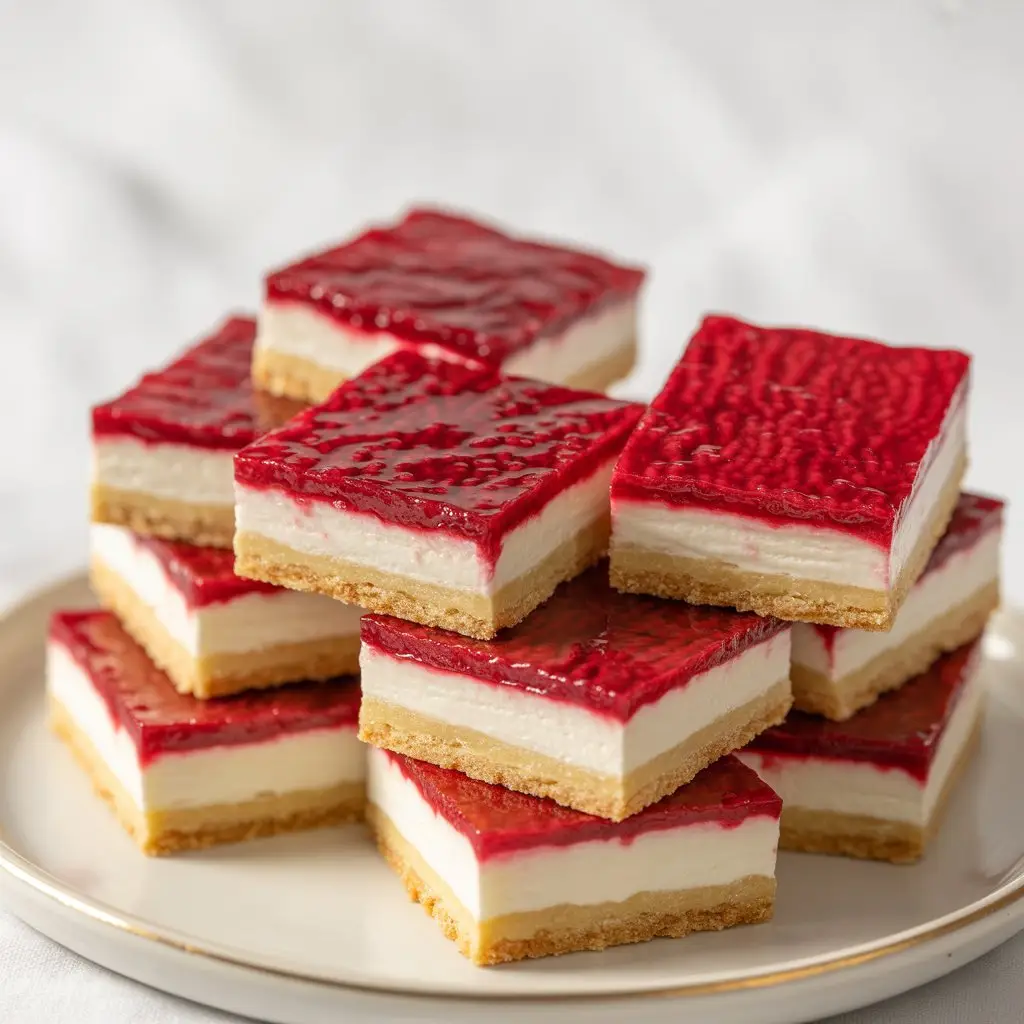
These little bites are my secret weapon now. They have the tangy punch of raspberry, the rich smoothness of cream cheese, and a buttery cookie crust that just ties it all together. They look like you spent hours, but you and I will know the truth.
Let’s make a dessert that saves the day and steals the show, without any of the stress.What You’ll Need
This recipe uses simple, easy-to-find ingredients. No need to hunt down anything exotic here; your local grocery store will have everything you need.
For the Crust:
- 1 ½ cups cookie crumbs (I use digestive biscuits or shortbread)
- 6 tablespoons unsalted butter, melted
- 2 tablespoons granulated sugar
For the Cream Cheese Filling:
- 16 ounces (two blocks) full-fat cream cheese, softened to room temperature
- ¾ cup powdered sugar
- 1 teaspoon vanilla extract
- ¼ cup heavy cream
For the Raspberry Topping:
- 2 cups fresh raspberries
- ¼ cup granulated sugar
- 1 tablespoon cornstarch
- 2 tablespoons water
Pro Tips
I’ve made these bites more times than I can count, and I’ve picked up a few tricks along the way. These little details make a big difference.
- Room Temperature is Key: I can’t stress this enough. Your cream cheese *must* be soft. Cold cream cheese will give you a lumpy filling, no matter how much you mix it. I usually set mine on the counter for about an hour before I start.
- Parchment Paper Slingshot: Line your baking pan with parchment paper, leaving some overhang on two sides. This creates little “handles” that let you lift the entire chilled block out of the pan easily. This is how you get those super clean, perfect squares.
- Don’t Scrape the Pan: When making the raspberry topping, some of the sugar might crystallize on the sides of the saucepan. Just ignore it. Scraping it into your sauce can cause the whole batch to become grainy.
- Chill, Seriously: The final chill time is not a suggestion. It’s what solidifies the filling and allows the flavors to meld together. Rushing this step will result in soupy, messy bites. Give it at least 4 hours, but overnight is even better.
Required Tools
You won’t need any fancy gadgets. Here’s a quick list of the kitchen essentials for this recipe.
- 8×8 inch square baking pan
- Parchment paper
- Food processor (or a zip-top bag and rolling pin for the crust)
- Large mixing bowl
- Electric hand mixer or stand mixer
- Small saucepan
- Spatula
- Measuring cups and spoons
Substitutions and Variations
Part of the fun of cooking is making a recipe your own. Here are a few swaps and ideas to get you started.
| Component | Variation Idea | Notes |
|---|---|---|
| Crust | Graham crackers, Biscoff cookies, Oreos (no filling) | Adjust butter if cookies are very dry or oily. |
| Fruit | Strawberries, blueberries, cherries, or lemon curd | Lemon curd can be spread directly on top. |
| Filling | Add ½ tsp of almond extract or citrus zest | Adds a subtle but delicious flavor twist. |
Make-Ahead Tips
These are fantastic for planning ahead. You can break down the process to make it even easier on the day of serving.
- 2 Days Ahead: You can prepare the cookie crust and press it into the pan. Cover it tightly and store it in the refrigerator.
- 1 Day Ahead: This is the ideal timeline. You can assemble the entire dessert—crust, filling, and topping—and let it chill in the fridge overnight. This gives it ample time to set perfectly.
How to Make Delightful Raspberry Cream Cheese Bites
Let’s get down to the steps. Just follow along, and you’ll have these ready in no time.
Part 1: The Buttery Cookie Crust
Step 1: Prepare your pan by lining an 8×8 inch pan with parchment paper, leaving some overhang on the sides to use as handles later.
Step 2: In a food processor, pulse your cookies until they form fine crumbs. If you don’t have one, place cookies in a large plastic bag and crush them with a rolling pin.
Step 3: Transfer the crumbs to a bowl. Add the granulated sugar and melted butter, and mix until all the crumbs are evenly moistened.
Step 4: Press the crumb mixture firmly and evenly into the bottom of your prepared pan. Use the bottom of a glass or measuring cup to get it nice and flat. Place the pan in the freezer for about 15 minutes to firm up while you make the filling.
Part 2: The Creamy Filling
Step 1: In a large mixing bowl, beat the softened cream cheese with an electric mixer on medium speed until it’s completely smooth and has no lumps.
Step 2: Add the powdered sugar and vanilla extract. Mix on low speed at first (to avoid a sugar cloud!), then increase to medium and beat until combined and smooth.
Step 3: Pour in the heavy cream and continue to beat on medium-high speed for about 2-3 minutes, or until the filling is light and airy.
Step 4: Spoon the filling over your chilled crust and spread it into an even layer with a spatula. Place it in the refrigerator while you make the topping.
Part 3: The Tangy Raspberry Topping
Step 1: In a small bowl, whisk together the cornstarch and cold water until it forms a smooth slurry with no lumps. Set aside.
Step 2: Add the fresh raspberries and sugar to a small saucepan over medium heat. As the berries heat up, mash them gently with a spoon or spatula. Cook for 3-4 minutes until the berries have broken down and the mixture is juicy.
Step 3: Stir in the cornstarch slurry. Continue to cook, stirring constantly, for another 1-2 minutes until the sauce thickens noticeably.
Step 4: Remove the topping from the heat and let it cool for about 15-20 minutes. It should be warm, not hot, before you pour it over the cream cheese layer.
Part 4: Assemble and Chill
Step 1: Gently pour the cooled raspberry topping over the cream cheese filling. Use a spatula to spread it evenly to the edges.
Step 2: Cover the pan with plastic wrap and transfer it to the refrigerator. Chill for a minimum of 4 hours, but preferably overnight, to allow it to set completely.
Step 3: Once chilled and firm, use the parchment paper handles to lift the entire block out of the pan. Place it on a cutting board and slice into small squares. For clean cuts, wipe your knife with a damp paper towel between each slice.
Nutrition, Swaps, and Serving Ideas
Here’s a little more information to help you fit this recipe into your life perfectly.
Nutritional Snapshot
This is an estimate, as brands and ingredients can vary. Consider this a general guide.
| Nutrient | Approx. Amount per Bite |
|---|---|
| Calories | 180-220 kcal |
| Fat | 15g |
| Carbohydrates | 12g |
| Protein | 3g |
Dietary Ingredient Swaps
- Gluten-Free: Simply use your favorite gluten-free shortbread or vanilla cookies for the crust. The rest of the ingredients are naturally gluten-free, but always check labels.
- Lower Sugar: You can reduce the sugar in the crust and topping by a tablespoon or two. For the filling, you can use a powdered sugar substitute that measures 1:1 with sugar.
Pairing and Efficiency
These bites are perfect with a cup of black coffee or a simple herbal tea. The bitterness of the coffee cuts through the richness beautifully.
For cooking efficiency, get the crust in the freezer first. While it’s chilling, you have the perfect window to make both the filling and the topping. By the time the topping is cooling, your crust is ready for the filling.
Leftovers and Storage
If you happen to have any leftovers, storing them is simple.
Place the bites in an airtight container in a single layer. They will keep well in the refrigerator for up to 4 days. The crust might soften slightly over time, but they will still be delicious.
I don’t recommend freezing the finished bites, as the cream cheese texture can change once thawed. However, you can freeze the crust on its own for up to a month.
Frequently Asked Questions
Q1. Can I use frozen raspberries?
Ans: Yes, absolutely. Thaw them first and drain any excess liquid before using them in the topping. You may need to cook the topping a minute or two longer to get it to the right thickness.
Q2. My cream cheese filling is lumpy. What did I do wrong?
Ans: This almost always happens when the cream cheese is too cold. Make sure it’s fully softened to room temperature before you start mixing for a silky smooth result.
Q3. Can I use a different size pan?
Ans: You can! A 9×9 inch pan will work, but your layers will be thinner and may need less chilling time. A 9-inch round springform pan also works wonderfully.
Q4. My raspberry topping seems too runny. How can I fix it?
Ans: The topping thickens significantly as it cools. If it still seems too thin after cooling for 15 minutes, you can return it to the saucepan on low heat and let it gently bubble for another minute or two. Just be sure to stir constantly.
Wrapping Up
And there you have it—a dessert that’s as easy as it is elegant. These raspberry cream cheese bites are proof that you don’t need a lot of time or a hot oven to create something truly special.
They are a crowd-pleaser for parties, a sweet treat for a quiet afternoon, and my go-to for just about any occasion that calls for dessert.
I hope you give them a try. When you do, come back and leave a comment below. I’d love to hear how they turned out for you or if you discovered any new variations!