I have a confession. For years, I thought ice cream cakes were some kind of magical dessert only available from special shops. They seemed complicated, a treat reserved for big, fancy birthday parties.
The layers, the perfect frosting… it all felt way out of my league. Then one sweltering summer afternoon, a craving hit so hard I decided to just try making one myself. And I discovered the secret.
The big secret? It’s ridiculously easy. It’s almost foolproof. This isn’t about precise baking or complicated techniques. This is about layering pure joy in a pan and letting the freezer do all the hard work for you.
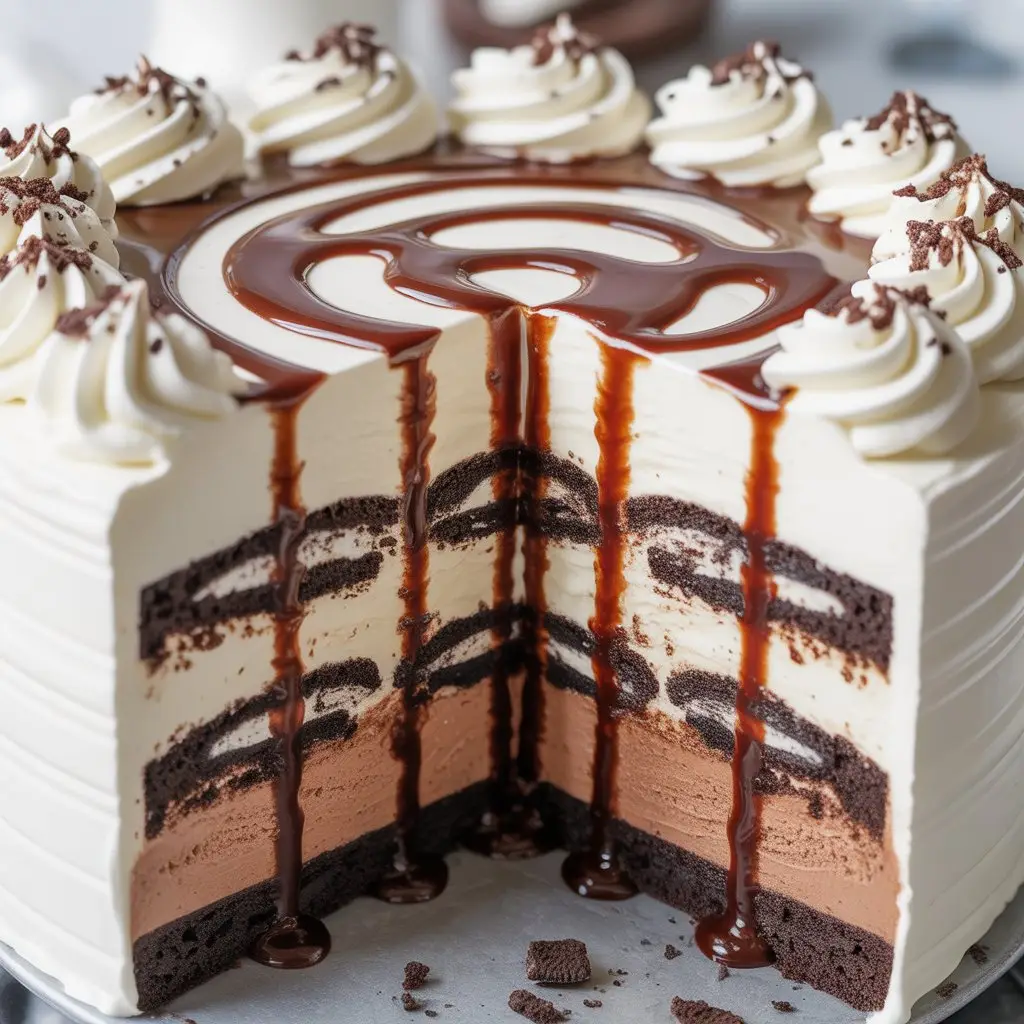
This Oreo Ice Cream Cake has become my go-to for everything. Potlucks, birthdays, or just a random Wednesday that needs a little boost. It looks impressive, tastes incredible, and nobody needs to know you barely broke a sweat making it.
What You’ll Need
The ingredient list is short and sweet, just the way it should be. No weird, hard-to-find items here.
- Oreo Cookies: You’ll need a whole family-size package (about 36 cookies). We’re using them for the crust and for a crunchy middle layer.
- Unsalted Butter: This binds our delicious Oreo crust together.
- Ice Cream: Two different flavors work best for a nice visual contrast. I’m using classic vanilla and chocolate, but you can get creative. You’ll need about 1.5 quarts (a standard carton) of each.
- Hot Fudge Sauce: A jar of your favorite store-bought hot fudge creates that amazing, gooey center.
- Whipped Topping: An 8-ounce tub of frozen whipped topping (like Cool Whip) makes for a stable, easy-to-spread top layer. You can also whip your own heavy cream.
- For Garnish (Optional): A little chocolate syrup and some extra crushed Oreos for the top.
Tools Required for the Job
You don’t need a professional kitchen, just a few basic tools to get this cake assembled.
- 9-inch Springform Pan: This is the most important tool. It has a removable side that makes releasing the cake a breeze.
- Food Processor or a Ziploc Bag: To crush the Oreos into fine crumbs for the crust. A rolling pin works great with the bag method.
- Large Mixing Bowls: You’ll need one for softening each flavor of ice cream.
- Offset Spatula or Rubber Spatula: For spreading the layers evenly. An offset spatula is particularly helpful.
- Measuring Cups and Spoons: For the butter and fudge.
How to Make Your Oreo Ice Cream Cake
Follow these steps, and I promise, you can’t go wrong. The most important ingredient here is patience while you wait for things to freeze!
Step 1: Make the Oreo Crust
Place about 24 Oreo cookies into a food processor and pulse until they become fine crumbs. If you don’t have a food processor, put them in a large Ziploc bag, seal it, and crush them with a rolling pin. Pour the crumbs into a bowl and mix with the melted butter until it looks like wet sand. Press this mixture firmly into the bottom of your 9-inch springform pan. Pop it in the freezer for at least 15-20 minutes to set.
Step 2: The First Ice Cream Layer
While the crust is chilling, take your first ice cream flavor (I start with chocolate) out of the freezer. Let it sit on the counter for about 10-15 minutes to soften. You want it spreadable, not melted into a puddle. Scoop the softened ice cream onto the chilled crust and spread it into an even layer with your spatula. Freeze for at least 30 minutes, or until firm to the touch.
Step 3: The Fudge and Crunch Layer
Take the remaining 12 Oreo cookies and give them a rough chop. You want bigger pieces this time, not fine crumbs. Take your cake out of the freezer. Gently warm the hot fudge sauce for a few seconds in the microwave so it’s easy to pour, then spread it over the firm chocolate ice cream layer. Immediately sprinkle the chopped Oreos over the fudge. Freeze again for another 30 minutes.
Step 4: The Second Ice Cream Layer
Time for your second ice cream flavor (vanilla for me). Let it soften just like the first one. Carefully spread it over the chilled fudge and Oreo layer, working quickly to create a smooth top. This is your final ice cream layer!
Step 5: The Final Freeze
Cover the pan tightly with plastic wrap. Freeze the cake for at least 4 hours, but overnight is even better. This ensures every layer is completely solid and the cake will slice beautifully.
Step 6: Decorate and Serve
Once the cake is fully frozen, remove it from the freezer. Spread the thawed whipped topping over the top layer. You can make pretty swirls with the back of a spoon. Drizzle with chocolate syrup and sprinkle with any leftover Oreo crumbs. To serve, run a thin knife around the inside edge of the pan before releasing the springform clasp. Slice and enjoy immediately!
Pro Tips From My Kitchen
I’ve made this cake more times than I can count. Here are a few things I’ve learned that make a real difference.
- Soften, Don’t Melt: This is the golden rule. Microwaving your ice cream is a recipe for disaster. It will melt unevenly and refreeze with an icy texture. Just let it sit on the counter. It’s worth the wait.
- Freeze Between Every Single Layer: I know it’s tempting to rush, but don’t. Freezing each layer until it’s firm is what creates those clean, distinct lines. If you don’t, the layers will bleed into each other and you’ll end up with a swirled mess.
- Use a Hot Knife for Slicing: For those picture-perfect slices, fill a tall glass with hot water. Dip a sharp knife into the water for a few seconds, wipe it dry with a towel, and then make your cut. Repeat for every slice. It cuts through the frozen cake like butter.
Substitutions and Variations
This recipe is a fantastic starting point. Feel free to mix it up based on what you love or what you have on hand.
| Component | Original | Fun Swaps |
|---|---|---|
| The Crust | Oreo Cookies | Graham crackers, Nutter Butters, chocolate chip cookies |
| The Ice Cream | Vanilla & Chocolate | Mint chip & chocolate, coffee & caramel, strawberry & vanilla |
| The Middle Layer | Hot Fudge Sauce | Caramel sauce, peanut butter sauce, strawberry jam |
| The Topping | Whipped Topping | Homemade whipped cream, chocolate ganache, marshmallow fluff |
Make-Ahead and Storage Tips
This is the ultimate make-ahead dessert. You can assemble the entire cake, without the final whipped topping garnish, up to a week in advance.
Wrap the pan securely in a layer of plastic wrap and then a layer of aluminum foil. This double-wrap method is the best defense against freezer burn. When you’re ready to serve, just add the whipped topping and garnishes.
For leftovers, you can either place the remaining cake (still in the pan) back in the freezer, well-wrapped, or cut it into individual slices. Store the slices in an airtight container in the freezer for up to a week.
Nutritional Information and Dietary Swaps
A heads-up: this is a decadent dessert, not health food! The nutritional information is an estimate for one slice (assuming the cake is cut into 12 servings).
Approximate Nutrition Per Slice: Calories: 450, Fat: 25g, Carbs: 50g, Sugar: 35g, Protein: 6g. This will vary widely based on the specific brands of ice cream and fudge you use.
You can easily adapt this recipe for different dietary needs.
| For This Diet | Use These Swaps |
|---|---|
| Gluten-Free | Use certified gluten-free chocolate sandwich cookies. |
| Vegan / Dairy-Free | Use dairy-free ice cream (almond, coconut, or soy-based), vegan butter, and a coconut or soy-based whipped topping. |
| Lower Sugar | Look for sugar-free cookies, keto-friendly ice cream, and a sugar-free fudge sauce. |
Frequently Asked Questions (FAQ)
Q1. My layers all blended together. What happened?
Ans: This is the most common issue, and it almost always means the layers weren’t frozen solid enough before adding the next one. Be patient and give each layer at least 30-45 minutes of dedicated freezer time.
Q2. Can I use a regular 9-inch cake pan?
Ans: You technically can, but serving will be very difficult. If you must, line the pan with plastic wrap or parchment paper, leaving a generous overhang on two sides. You can use these “handles” to lift the entire cake out of the pan before slicing.
Q3. My Oreo crust is falling apart. How can I fix it?
Ans: This usually means the crumb-to-butter ratio was a little off. Your crust might be too dry. Try adding another tablespoon of melted butter to your mixture until it holds its shape when you squeeze a handful.
Q4. How long does the cake need to be in the freezer before serving?
Ans: For the best, cleanest slices, plan for a minimum of 4 hours of freezing time after the final layer is on. Honestly, leaving it to set overnight is the absolute best way to guarantee a perfectly firm cake.
Wrapping Up
There you have it. The secret to amazing, homemade Oreo ice cream cake is out, and the secret is… there is no secret! It’s just simple, delicious ingredients layered with a little bit of patience.
Now it’s your turn. Give this recipe a try for your next celebration, or just because. Get creative with the flavors and make it your own.
I would absolutely love to hear how it turns out for you. Drop a comment below and let me know what flavor combinations you tried or if you have any questions.