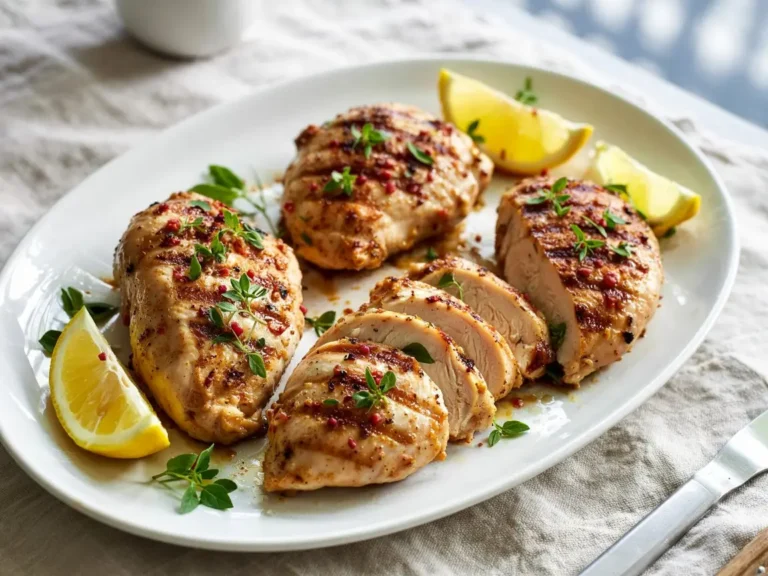
The Only Pan-Seared Chicken Thigh Recipe You’ll Ever Need
Let’s be honest, chicken can be a bit… predictable. It’s often the default weeknight dinner, but it can easily turn out dry, bland, or just plain boring.
I’ve been there more times than I can count, staring at a pack of chicken with zero inspiration. But I found a secret weapon: the boneless, skinless chicken thigh.
Forget everything you think you know about lackluster chicken. Thighs are packed with flavor and are incredibly forgiving. It’s almost impossible to dry them out.
This recipe transforms them into something special with a ridiculously crispy crust and a simple, yet elegant, garlic herb butter sauce. It’s the kind of meal that feels fancy but comes together in under 30 minutes.
What You’ll Need
Here are the simple ingredients that create all that amazing flavor.
- Boneless, Skinless Chicken Thighs: About 1.5 pounds, or 6 to 8 thighs.
- Olive Oil: Just a tablespoon for the pan.
- Salt: Coarse sea salt or kosher salt works best.
- Black Pepper: Freshly ground makes a huge difference.
- Garlic Powder: For a deep, savory base seasoning.
- Unsalted Butter: A few tablespoons to create that rich pan sauce.
- Fresh Garlic: 2-3 cloves, minced. This is for the sauce, not the initial seasoning.
- Fresh Herbs: A small handful of thyme sprigs or chopped parsley.
Tools Required
You don’t need much, which is the beauty of this dish. Having the right pan is key.
- A large skillet (cast iron, stainless steel, or heavy-bottomed non-stick)
- Tongs
- A meat thermometer
- Paper towels
- A small bowl for seasoning
How to Make Perfect Pan-Seared Chicken Thighs
Follow these steps closely, and you’ll get juicy, crispy chicken every single time.
Step 1: Prep the Chicken
Take the chicken thighs out of the package and pat them completely dry with paper towels. This is the most important step for getting a crispy sear. Seriously, don’t skip it. The drier the surface, the better the crust.
Step 2: Season Generously
In a small bowl, mix your salt, black pepper, and garlic powder. Sprinkle this seasoning mix evenly over all sides of the chicken thighs. Don’t be shy with it.
Step 3: Get the Pan Hot
Place your large skillet over medium-high heat. Add the olive oil. You’ll know the pan is ready when the oil shimmers slightly. A hot pan is crucial for that initial sear.
Step 4: Sear the Chicken
Carefully place the chicken thighs in the hot pan, smooth-side down. Let them cook, undisturbed, for about 5-7 minutes. You want to see a deep, golden-brown crust form. Resist the urge to move them around.
Step 5: Flip and Continue Cooking
Flip the chicken thighs over. Cook for another 5-7 minutes on the other side. The internal temperature should reach 165°F (74°C). Use a meat thermometer to be sure.
Step 6: Create the Pan Sauce
Turn the heat down to low. Add the butter, minced garlic, and fresh thyme to the pan. As the butter melts, tilt the pan and use a spoon to baste the chicken with the garlic herb butter for about a minute. The smell will be incredible.
Step 7: Rest the Chicken
Remove the chicken from the pan and transfer it to a cutting board. Let it rest for at least 5 minutes. This allows the juices to redistribute, ensuring every bite is moist.
Pro Tips
I’ve made this dish hundreds of times. Here are a few things I’ve learned that make a real difference.
- Don’t Crowd the Pan. If you put too many thighs in the skillet at once, they will steam instead of sear. Cook in two batches if needed. It’s worth the extra few minutes.
- Use a Thermometer. It’s the only foolproof way to know your chicken is perfectly cooked—safe to eat but not overdone. Chicken thighs are forgiving, but this guarantees perfection.
- Let It Rest. I know it’s tempting to cut right in, but resting the meat is non-negotiable. Slicing too early means all those delicious juices end up on the cutting board instead of in the chicken.
Substitutions and Variations
This recipe is a great starting point. Feel free to play with it.
| Ingredient | Substitution Ideas |
|---|---|
| Herbs | Rosemary, sage, or even a pinch of dried Italian seasoning work well. |
| Spices | Add smoked paprika or onion powder to the seasoning mix for a different flavor. |
| Butter | For a dairy-free version, use a high-quality vegan butter or more olive oil. |
| Acid | A squeeze of fresh lemon juice into the pan sauce at the end brightens everything up. |
Dietary Swaps & Pairings
This recipe is very flexible. Here’s how to adapt it for different needs and what to serve it with.
| Diet / Preference | Modification or Pairing Suggestion |
|---|---|
| Low-Carb / Keto | The recipe is naturally low-carb. Serve with cauliflower mash or zucchini noodles. |
| Dairy-Free | Use olive oil or a dairy-free butter alternative for the pan sauce. |
| Classic Comfort | Pair with creamy mashed potatoes and green beans. Don’t forget to spoon the pan sauce over everything! |
| Light & Fresh | Serve with a simple arugula salad with a lemon vinaigrette or some roasted asparagus. |
Make-Ahead Tips
You can do the seasoning step ahead of time. Pat the chicken dry, apply the salt, pepper, and garlic powder, and store it in an airtight container in the fridge for up to 24 hours. This acts as a dry brine and adds even more flavor.
Leftovers and Storage
If you have any leftovers, store them in an airtight container in the refrigerator for up to 3-4 days.
To reheat, I recommend using a skillet over medium-low heat for a few minutes on each side. The microwave works, but you’ll lose the crispy texture. Leftover chicken is also great when sliced and added to salads or wraps.
Frequently Asked Questions
Q1. Can I use chicken breasts instead of thighs?
Ans: Yes, but you’ll need to be more careful not to overcook them. Chicken breasts are leaner and dry out faster. Pound them to an even thickness and use a meat thermometer, pulling them from the heat as soon as they reach 165°F.
Q2. My chicken skin didn’t get crispy. What did I do wrong?
Ans: There are three likely reasons: your chicken wasn’t dry enough, your pan wasn’t hot enough, or you moved the chicken around too much while it was searing. Make sure you pat it very dry and let it cook undisturbed to build that crust.
Q3. Can I use bone-in, skin-on thighs?
Ans: Absolutely! Skin-on thighs will get even crispier. You’ll need to increase the cooking time. Sear the skin side first for 8-10 minutes, then flip and cook for another 10-15 minutes, or until the internal temperature is 165°F.
Wrapping Up
That’s all there is to it. This simple method for cooking chicken thighs delivers a fantastic meal that’s quick enough for a Tuesday but delicious enough for a Saturday night.
The crispy exterior combined with the tender, juicy meat and that garlic butter sauce is a winning combination every time.
Give this recipe a try next time you’re looking to elevate your chicken game. I’d love to hear how it turns out for you. Leave a comment below with your experience or any questions you might have!