Cuisinart Ice Cream Maker Recipes
Your Cuisinart has been sitting in the cabinet for months.
Maybe you used it once, made vanilla, thought “meh,” and forgot about it.
Here’s what nobody tells you: homemade ice cream isn’t just better than store-bought. It’s a completely different food.
We’re talking about creamy, rich, customizable flavors that cost half the price and don’t come with a list of ingredients you can’t pronounce.
I’m about to walk you through my go-to Cuisinart ice cream maker recipes that’ll have you making ice cream at least twice a week (like I do now 😅).
Let’s turn that dusty machine into your new favorite kitchen gadget.
What You’ll Need
Classic Vanilla Base
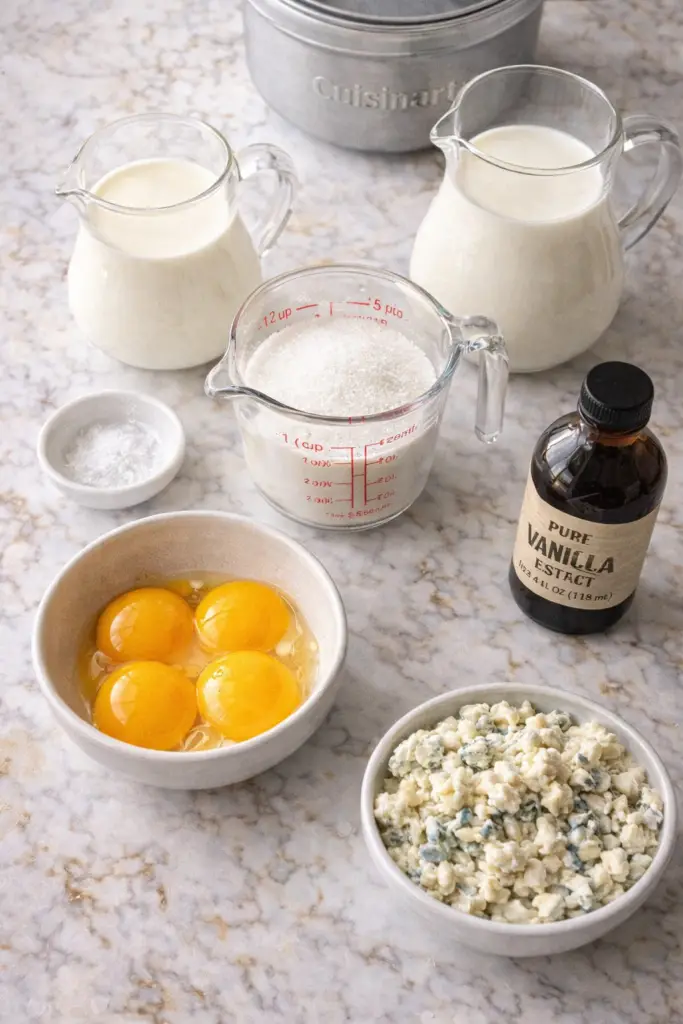
| Ingredient | Amount | Why It Matters |
|---|---|---|
| Heavy cream | 2 cups | Creates that rich, creamy texture |
| Whole milk | 1 cup | Balances richness without being too heavy |
| Granulated sugar | 3/4 cup | Sweetness + keeps ice cream scoopable |
| Egg yolks | 4 large | Makes it ultra-creamy (the secret weapon) |
| Pure vanilla extract | 1 tablespoon | Real vanilla > fake vanilla, always |
| Salt | Pinch | Enhances all the other flavors |
No-Churn Chocolate
| Ingredient | Amount | The Job It Does |
|---|---|---|
| Heavy whipping cream (cold) | 2 cups | Whips up into fluffy clouds |
| Sweetened condensed milk | 1 can (14 oz) | Sweetness + creaminess in one |
| Unsweetened cocoa powder | 1/2 cup | Deep chocolate flavor |
| Vanilla extract | 1 teaspoon | Brings out the chocolate |
Salted Caramel Swirl
Ice Cream Base:
| Ingredient | Amount |
|---|---|
| Heavy cream | 2 cups |
| Whole milk | 1 cup |
| Sugar | 3/4 cup |
| Egg yolks | 4 |
| Vanilla extract | 2 teaspoons |
Caramel Swirl:
| Ingredient | Amount |
|---|---|
| Sugar | 1 cup |
| Butter (cubed) | 6 tablespoons |
| Heavy cream | 1/2 cup |
| Sea salt | 1 teaspoon |
Strawberry Cheesecake
Ice Cream:
| Ingredient | Amount |
|---|---|
| Heavy cream | 2 cups |
| Whole milk | 1 cup |
| Sugar | 3/4 cup |
| Cream cheese (softened) | 8 oz |
| Vanilla | 1 teaspoon |
Strawberry Mix:
| Ingredient | Amount |
|---|---|
| Fresh strawberries (diced) | 2 cups |
| Sugar | 1/4 cup |
| Graham cracker crumbs | 1 cup |
Tools You’ll Need
| Tool | Why You Need It | Can You Skip It? |
|---|---|---|
| Cuisinart Ice Cream Maker | The star of the show | No way |
| Medium saucepan | For making custard bases | Nope |
| Whisk | Prevents lumps | Use a fork in a pinch |
| Fine-mesh strainer | Removes cooked egg bits | Kinda important |
| Mixing bowls (2-3) | Prep and storage | Yes, but annoying |
| Rubber spatula | Scrapes every bit | Use a spoon instead |
| Measuring cups & spoons | Precision matters | Don’t wing it |
| Thermometer | Takes guesswork out | Nice to have |
| Freezer-safe containers | Storing your creations | Use anything airtight |
Pro Tips
1. Freeze That Bowl Like Your Life Depends On It
Your Cuisinart bowl needs at least 12 hours in the freezer.
Not 11 hours. Not “it feels cold enough.”
A full 12 hours minimum.
I keep mine in there permanently so I’m always ready to make ice cream on a whim. Wrap it in a plastic bag so it doesn’t get freezer burn smell.
2. Chill Your Base Completely (No Cheating)
Room temperature mix = icy, grainy ice cream that’ll make you sad.
Your base needs to be fridge-cold for at least 4 hours, preferably overnight, before it goes in the machine.
Pro Move: Make your base in the morning, let it chill all day, and churn it after dinner. Perfect timing.
3. The 2/3 Rule Saves Lives
Only fill your ice cream maker about 2/3 full.
The mixture expands as it churns. Overfill it and you’ll have ice cream mixture all over your counter.
Trust me on this one. 😬
Also Read: Chicken Gizzard Recipe
4. Mix-Ins Go In Last (Or They’ll Get Destroyed)
Chocolate chips, cookie chunks, nuts?
Add them in the last 2 minutes of churning.
Any earlier and they’ll either sink to the bottom or get pulverized into dust.
5. Soft-Serve Stage Is Normal
When your ice cream comes out of the Cuisinart, it’ll look like soft-serve.
That’s exactly what it should be.
Transfer it to a container and freeze for 3-4 hours for that scoopable texture you’re after.
Classic Vanilla (The Foundation)

This is the recipe you need to master first.
Once you nail this, you can customize it a million ways.
Step 1: Make the Custard Base
Heat the milk, 1 cup of cream, sugar, and salt in a medium saucepan over medium heat.
Stir occasionally until the sugar dissolves and tiny bubbles form around the edges.
Don’t let it boil. We’re not making scrambled eggs here.
Step 2: Temper the Eggs
Whisk the egg yolks in a separate bowl.
Slowly pour about 1 cup of the hot milk mixture into the yolks while whisking constantly.
This gradually warms the eggs without scrambling them. Go slow. Be patient.
Step 3: Cook Until Thickened
Pour the egg mixture back into the saucepan with the remaining milk.
Cook over medium-low heat, stirring constantly with a wooden spoon or spatula.
You’re done when the mixture thickens enough to coat the back of the spoon (about 170°F if you’re using a thermometer).
The Spoon Test: Run your finger across the back of the spoon. If it leaves a clear line, you’re good.
Step 4: Strain and Chill
Pour the mixture through a fine-mesh strainer into a clean bowl.
This catches any bits of cooked egg.
Stir in the remaining 1 cup of cream and the vanilla extract.
Cover with plastic wrap (press it directly onto the surface to prevent a skin from forming).
Refrigerate for at least 4 hours or overnight.
Step 5: Churn
Pour the chilled mixture into your frozen Cuisinart bowl.
Turn on the machine and churn for 20-25 minutes until it reaches soft-serve consistency.
Transfer to a freezer-safe container and freeze for at least 3-4 hours before serving.
Time Breakdown:
| Step | Active Time | Passive Time |
|---|---|---|
| Make custard | 15 minutes | – |
| Chill base | – | 4-12 hours |
| Churn | 2 minutes setup | 20-25 minutes |
| Final freeze | – | 3-4 hours |
No-Churn Chocolate (The Easy Route)
Can’t be bothered with custard?
This method is foolproof.
Step 1: Whip the Cream
Beat the heavy cream in a large bowl using a hand mixer or stand mixer on high speed.
Keep going until stiff peaks form.
This takes about 3-4 minutes. Your arm will get tired if you’re doing it by hand.
Step 2: Mix the Base
In another bowl, whisk together the sweetened condensed milk, cocoa powder, and vanilla.
Mix until completely smooth.
No lumps allowed. Be thorough here.
Also Read: Homemade Banana Blueberry Muffins With Protein Boost
Step 3: Fold Together
Gently fold the whipped cream into the chocolate mixture using a rubber spatula.
Use a figure-eight motion to keep as much air as possible in the mixture.
Don’t stir. Don’t whisk. Fold.
Step 4: Churn
Pour into your frozen Cuisinart bowl and churn for 15-20 minutes.
The texture will be lighter than custard-based ice cream, but equally delicious.
Freeze for 3-4 hours before serving.
Fun Fact: This method was invented during World War II when eggs were rationed. Turns out, restrictions breed creativity.
Salted Caramel Swirl (The Show-Stopper)
This one requires a bit more effort.
But holy moly, it’s worth it. 🤤
Part 1: Make the Caramel
Step 1: Add sugar to a light-colored saucepan (so you can see the color change) over medium heat.
Don’t stir. Just swirl the pan occasionally as the sugar melts.
Step 2: Watch it turn from white to golden to amber.
This takes about 8-10 minutes. Don’t walk away.
Step 3: Once fully melted and golden brown, carefully add the butter.
It’ll bubble violently. That’s normal. Stir until the butter melts completely.
Step 4: Remove from heat and slowly pour in the cream while stirring.
The mixture will bubble again. Keep stirring until smooth.
Step 5: Add the sea salt. Let it cool completely.
Part 2: Make the Ice Cream
Follow the same custard method as the vanilla recipe above.
All the same steps. Same timing. Same everything.
Part 3: Churn and Swirl
Churn your vanilla base for 20-25 minutes.
During the last 2 minutes, drizzle in about half of the cooled caramel.
The Layering Technique:
| Layer | What Goes In |
|---|---|
| Bottom third | Half the churned ice cream |
| Middle | Caramel drizzle + swirl with knife |
| Top two-thirds | Remaining ice cream |
| Very top | Final caramel drizzle + swirl |
Use a butter knife to gently swirl it through the ice cream.
Don’t overmix. You want distinct ribbons, not fully blended caramel.
Freeze for at least 4 hours.
Reality Check: The first time I made this, I ate half the container before it even fully froze. No shame.
Strawberry Cheesecake (The Summer Favorite)
This tastes exactly like eating strawberry cheesecake.
Except frozen and somehow better.
Step 1: Prep the Strawberries
Toss the diced strawberries with 1/4 cup sugar.
Let them sit for 30 minutes to release their juices.
Mash them slightly with a fork, leaving some chunks. We want texture.
Step 2: Make the Base
Beat the softened cream cheese with the sugar until smooth.
No lumps. Use an electric mixer if you have one.
Add the milk gradually, then the cream and vanilla.
Mix until completely combined and no cream cheese lumps remain.
Tip: Room temperature cream cheese blends way easier than cold cream cheese. Take it out 30 minutes before you start.
Step 3: Chill and Churn
Refrigerate the mixture for at least 4 hours.
Pour into your frozen Cuisinart bowl and churn for 20-25 minutes.
Step 4: Layer It
The Assembly:
| Layer Number | What Goes In |
|---|---|
| 1 (bottom) | 1/3 of ice cream |
| 2 | Graham cracker crumbs |
| 3 | Strawberry mixture |
| 4 | 1/3 of ice cream |
| 5 | Graham cracker crumbs |
| 6 | Strawberry mixture |
| 7 (top) | Final 1/3 of ice cream |
| Finishing touch | Extra graham crumbs on top |
You want those distinct layers that surprise you with every bite.
Freeze for 4 hours minimum.
Also Read: Easy Berry Croissant Breakfast Bake
Substitutions and Variations
Dairy-Free Options
| Original Ingredient | Swap It For | How It Changes |
|---|---|---|
| Heavy cream | Full-fat coconut milk | Slight coconut flavor, still creamy |
| Whole milk | Oat milk | Lighter texture, less rich |
| Cream cheese | Cashew cream cheese | Works great, slightly different tang |
The texture won’t be identical, but it’s still really good.
Lower Sugar
You can reduce the sugar by up to 1/4 cup.
But know that sugar isn’t just for sweetness.
It affects texture and how scoopable your ice cream stays.
Less sugar = harder ice cream.
Flavor Variations for Vanilla Base
| Add This | When to Add | Amount | What You Get |
|---|---|---|---|
| Coffee extract | With vanilla | 2 tablespoons | Coffee ice cream |
| Mint extract | With vanilla | 1 teaspoon | Mint chip (add chocolate chips at end) |
| Crushed Oreos | Last 2 minutes | 1 cup | Cookies and cream |
| Peanut butter | Warm into base | 1/2 cup | Peanut butter ice cream |
| Brownie chunks | Last 2 minutes | 1 cup | Brownie batter ice cream |
| Lemon zest + juice | With vanilla | Zest of 2 lemons + 2 tbsp juice | Lemon ice cream |
Egg-Free Option
Skip the custard method entirely.
Use the no-churn technique with any flavor.
Just adjust your flavorings to taste.
Make Ahead Tips
Your ice cream base actually tastes better when made a day ahead.
The flavors have time to develop and meld together.
The Perfect Timeline:
| Day | What to Do | Time Required |
|---|---|---|
| Day 1 (morning) | Make custard base | 20 minutes |
| Day 1 (evening) | Base is chilled and ready | – |
| Day 1 (after dinner) | Churn the ice cream | 25 minutes |
| Day 2 (afternoon) | Perfect scoopable ice cream | – |
For caramel sauce, make it up to a week ahead and store it in the fridge.
Just warm it slightly before adding to your ice cream so it’s pourable.
Finished ice cream keeps for about 2 weeks in the freezer.
But let’s be honest, it never lasts that long.
Press plastic wrap directly on the surface before putting the lid on to prevent freezer burn and ice crystals.
Additional Details
Cost Breakdown (Because Homemade Saves Money)
| Recipe | Ingredient Cost | Store-Bought Equivalent | You Save |
|---|---|---|---|
| Vanilla | $6.50 | $8.99 | $2.49 |
| Chocolate | $5.75 | $7.99 | $2.24 |
| Salted Caramel | $8.25 | $12.99 | $4.74 |
| Strawberry Cheesecake | $9.50 | $11.99 | $2.49 |
Plus, you know exactly what’s in it. No weird stabilizers or ingredients you can’t pronounce.
Nutritional Breakdown (Per 1/2 Cup Serving)
| Recipe | Calories | Fat | Carbs | Protein |
|---|---|---|---|---|
| Vanilla | 280 | 20g | 22g | 4g |
| Chocolate | 310 | 22g | 26g | 5g |
| Salted Caramel | 320 | 23g | 28g | 4g |
| Strawberry Cheesecake | 295 | 21g | 24g | 5g |
Pairing Suggestions
| Ice Cream Flavor | Pair It With | Why It Works |
|---|---|---|
| Vanilla | Warm apple pie, chocolate brownies | Classic combos never fail |
| Vanilla (adventurous) | Olive oil drizzle + sea salt | Sounds weird, tastes amazing |
| Chocolate | Peanut butter cookies, raspberry sauce | Sweet + salty, tart + rich |
| Salted Caramel | Warm chocolate chip cookies, apple crisp | The warmth melts the ice cream perfectly |
| Strawberry Cheesecake | Fresh berries, lemon pound cake, vanilla wafers | Extra cheesecake vibes |
Time Efficiency Guide
| Task | Hands-On Time | Total Time (Including Passive) |
|---|---|---|
| Custard-based recipes | 20 minutes | 8-16 hours |
| No-churn recipes | 10 minutes | 7-11 hours |
| Weekend batch-making (3 flavors) | 1 hour | – |
I usually start my base in the morning, churn after dinner, and have perfect ice cream by the next day.
Weekend batch-making works great. Make 2-3 flavors on Sunday and you’ve got dessert sorted for the week.
Leftovers and Storage
Storage Best Practices
| Do This | Not This | Why |
|---|---|---|
| Use shallow containers | Deep narrow containers | Freezes faster and more evenly |
| Press plastic wrap on surface | Just put the lid on | Prevents ice crystals |
| Let sit 5-10 min before scooping | Scoop immediately | Easier scooping |
| Store at 0°F or below | Store at 10-15°F | Stays creamier longer |
The Microwave Trick
Got ice cream that’s too hard to scoop?
Microwave it for 10-15 seconds.
Not kidding.
Just enough to soften the edges for easier scooping. Don’t tell anyone I told you this.
Also Read: PF Chang’s Chicken Lettuce Wraps (Easy Family Favorite)
Rescue Mission for Old Ice Cream
Got leftover ice cream that’s been in the freezer too long and developed ice crystals?
Blend it up into a milkshake.
Problem solved. Crisis averted.
FAQ
Why is my ice cream icy and not creamy?
Three common culprits:
- Your base wasn’t cold enough before churning
- Your freezer bowl wasn’t frozen solid (it should be like a rock)
- You churned it too long
Aim for 20-25 minutes max for churning.
Can I use this recipe in a different ice cream maker?
Yep. These recipes work in any home ice cream maker.
Just follow your machine’s instructions for churning time since it might vary.
The principles stay the same.
My ice cream turned into butter. What happened?
You over-churned it.
The cream separated and started turning into butter.
Stop churning as soon as it reaches soft-serve consistency. Set a timer if you need to.
Do I really need to use egg yolks?
For custard-based recipes, yes.
They create that ultra-creamy texture that makes homemade ice cream special.
But the no-churn recipes skip eggs entirely if that’s your preference.
How do I prevent ice crystals from forming?
Press plastic wrap directly onto the ice cream surface before putting the lid on.
This prevents air exposure.
Also, make sure your freezer is at 0°F or below. Warmer freezers = more ice crystals.
Can I add alcohol to my ice cream?
You can, but it affects the freezing.
Alcohol doesn’t freeze, so too much will keep your ice cream soft.
Stick to 2-3 tablespoons max per batch.
Fun combos:
- Bourbon in vanilla
- Kahlua in chocolate
- Grand Marnier in strawberry
Also Read: Baked Jumbo Shrimp Stuffed with Crabmeat
Why doesn’t my homemade ice cream scoop like store-bought?
Store-bought ice cream has stabilizers and more air whipped in (up to 50% air sometimes).
Let yours sit out for 5-10 minutes before scooping.
Or add 1 tablespoon of vodka to your base. It keeps it softer without affecting the flavor.
Can I make these recipes without the Cuisinart?
The no-churn recipes work without any machine at all.
Just skip the churning step and freeze directly.
For custard-based recipes, you really need some kind of ice cream maker for the best texture.
Wrapping Up
You’ve now got four solid Cuisinart ice cream maker recipes that’ll make you forget store-bought ice cream exists.
Start with the classic vanilla to get your technique down.
Once you nail that, everything else is just flavor variations.
The chocolate is perfect for when you need something quick. The salted caramel is what you make when you want to impress someone. And the strawberry cheesecake? That’s pure summer in a bowl.
Your Cuisinart is about to become your hardest-working kitchen appliance.
Mine runs at least twice a week now because once you taste real homemade ice cream, there’s no going back.
Drop a comment below and tell me which flavor you’re making first.
Or if you’ve got a Cuisinart ice cream maker recipe that’s your secret weapon, share it.
We’re all here for the ice cream talk.

