
Brown Butter Chocolate Chip Cookies

ou know that smell when chocolate chip cookies are baking in the oven?
That warm, sweet aroma filling the entire kitchen.
It’s comforting. It reminds you of childhood, holidays, family gatherings, and those moments when you can’t wait for the cookies to cool before stealing one from the tray.
Classic chocolate chip cookies are already amazing.
But what if I told you there is one simple technique that can completely transform them?
It doesn’t require expensive ingredients.
It doesn’t require special equipment.
It doesn’t require complicated baking skills.
The secret is simple:
Brown the butter.
Instead of using regular softened butter, this recipe takes butter one step further by slowly cooking it until the milk solids turn golden brown.
That small extra step creates:
- A deep nutty flavor
- A toasted caramel aroma
- A richer cookie dough
- More complex sweetness
The difference is incredible.
These are not ordinary chocolate chip cookies.
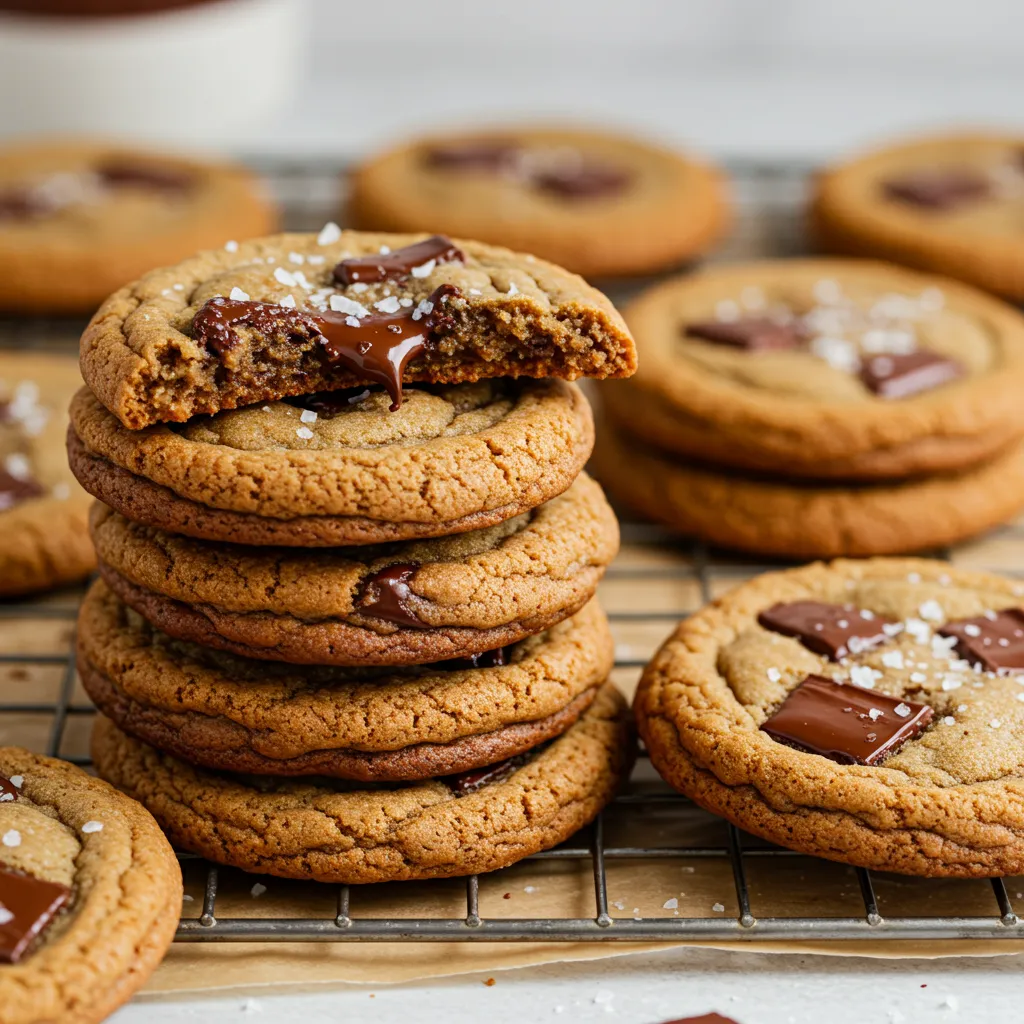
These are brown butter chocolate chip cookies with crispy golden edges, soft chewy centers, melted chocolate pockets, and a flavor that tastes like something from a professional bakery.
The best part?
They are surprisingly easy to make.
Once you learn how to brown butter properly, you’ll never look at regular chocolate chip cookies the same way again.
Why Brown Butter Makes Chocolate Chip Cookies Better
Butter already contains amazing flavor.
But when you heat it, something magical happens.
Butter is made of:
- Water
- Milk solids
- Butterfat
During browning, the water evaporates and the milk solids begin to toast.
This creates a chemical reaction called the Maillard reaction, which develops hundreds of new flavor compounds.
The result?
A butter that tastes:
- Nutty
- Toasty
- Slightly caramelized
- Rich and complex
When added to cookie dough, brown butter gives the cookies a deeper flavor that regular butter simply cannot achieve.
What Makes These Brown Butter Chocolate Chip Cookies Different?
A great chocolate chip cookie is all about balance.
You want:
- Crispy edges
- Soft centers
- Chewy texture
- Rich chocolate flavor
- Just enough sweetness
This recipe achieves that balance through a few important techniques.
Brown Butter Creates Deep Flavor
The browned butter is the star ingredient.
It gives every bite a warm, toasted flavor that makes the cookies taste more sophisticated.
Brown Sugar Adds Chewiness
Brown sugar contains molasses, which adds:
- Moisture
- Caramel notes
- Soft texture
This helps create the chewy center everyone loves.
Chilling the Dough Prevents Flat Cookies
Many cookie problems come from skipping the chilling step.
Cold dough helps:
- Control spreading
- Improve texture
- Develop flavor
The longer the dough rests, the better the flavor becomes.
Chopped Chocolate Creates Better Melting
Chocolate chips work perfectly, but chopped chocolate takes these cookies to another level.
Why?
Because chopped chocolate creates:
- Large melted chocolate pockets
- Small chocolate pieces throughout the dough
- Better chocolate distribution
Every bite gets a different amount of chocolate.
Brown Butter Chocolate Chip Cookies Recipe Overview
| Feature | Details |
|---|---|
| Recipe Type | Homemade chocolate chip cookies |
| Main Technique | Brown butter method |
| Texture | Crispy edges with chewy centers |
| Preparation Time | About 20 minutes |
| Chill Time | Minimum 1 hour |
| Baking Time | 10-12 minutes |
| Total Time | Around 1 hour 30 minutes |
| Servings | Approximately 24 cookies |
| Difficulty Level | Easy |
| Best For | Holidays, desserts, gifting, family baking |
What You’ll Need
Before starting, gather all your ingredients.
In professional kitchens, chefs call this process mise en place, which simply means having everything prepared and ready before cooking.
It makes baking easier because you are not searching for ingredients halfway through the recipe.
Here is everything you need.
Brown Butter Chocolate Chip Cookie Ingredients
| Ingredient | Amount | Notes |
|---|---|---|
| Unsalted Butter | 1 cup (2 sticks) | The star of the show. |
| All-Purpose Flour | 2 ¼ cups | The structure of the cookie. |
| Baking Soda | 1 teaspoon | Helps cookies rise and spread. |
| Salt | 1 teaspoon | Balances sweetness. |
| Brown Sugar | 1 cup, packed | Adds moisture and caramel flavor. |
| Granulated Sugar | ½ cup | Creates sweetness and crispy edges. |
| Large Eggs | 2 | Binds everything together. |
| Vanilla Extract | 2 teaspoons | Adds classic cookie flavor. |
| Chocolate Chips or Chunks | 2 cups | Semi-sweet works beautifully. |
| Flaky Sea Salt | For sprinkling | Optional but highly recommended. |
Ingredient Breakdown: Why Each Component Matters
Every ingredient plays an important role in creating the perfect cookie.
Unsalted Butter
Butter is the foundation of this recipe.
Using unsalted butter gives you better control over the salt level.
During browning:
- Water evaporates.
- Milk solids toast.
- Flavor becomes richer.
This is what creates the signature brown butter taste.
All-Purpose Flour
Flour provides structure.
Too much flour creates dry, cakey cookies.
Too little flour creates cookies that spread too much.
The measurement matters.
For best results:
- Spoon flour into the measuring cup.
- Level it with a knife.
- Avoid packing it tightly.
Brown Sugar
Brown sugar is responsible for the soft, chewy texture.
The molasses inside brown sugar adds:
- Moisture
- Richness
- Caramel flavor
Packed brown sugar means you press it firmly into the measuring cup before adding it.
Granulated Sugar
White sugar creates:
- Crisp edges
- Slight caramelization
- Proper cookie spread
The combination of brown sugar and white sugar gives these cookies the perfect texture balance.
Eggs
Eggs provide:
- Structure
- Moisture
- Binding
Adding them one at a time helps them blend evenly into the dough.
Vanilla Extract
Vanilla enhances all the other flavors.
Even though it seems like a small amount, it makes the chocolate and brown butter taste richer.
Chocolate
Chocolate is the highlight.
Semi-sweet chocolate is classic because it balances the sweetness of the cookie dough.
You can use:
- Chocolate chips
- Chocolate chunks
- Chopped chocolate bars
Each creates a slightly different result.
Tools You’ll Need
You don’t need professional baking equipment.
A few basic kitchen tools are enough.
✓ Light-colored saucepan
✓ Large mixing bowl
✓ Medium mixing bowl
✓ Whisk
✓ Rubber spatula
✓ Baking sheets
✓ Parchment paper
✓ Cookie scoop or spoon
✓ Cooling rack
Why a Light-Colored Pan Matters for Brown Butter
This is one of the most important tools for this recipe.
A light-colored saucepan allows you to see the butter changing color.
You need to watch for:
- Golden brown milk solids
- Tiny brown specks
- Nutty aroma
A dark pan can make it difficult to tell when the butter is perfectly browned.
That increases the chance of accidentally burning it.
Pro Tips for Perfect Brown Butter Chocolate Chip Cookies
After making countless batches of cookies, these are the techniques that make the biggest difference.
Watch the Butter Carefully
Brown butter can go from perfect to burnt very quickly.
The process happens in stages:
Stage 1: Melting
The butter becomes liquid.
Stage 2: Foaming
The water begins evaporating.
Stage 3: Crackling
The milk solids separate.
Stage 4: Browning
Small golden-brown bits appear.
This is the moment you want.
Once you smell a nutty aroma and see brown specks:
Remove the pan immediately.
The butter continues cooking from residual heat, so waiting too long can ruin it.
Use Quality Chocolate
The chocolate makes a huge difference.
Instead of only using standard chocolate chips, try chopping a good semi-sweet chocolate bar.
You will get:
- Small chocolate flakes
- Medium pieces
- Large melted pools
This creates a more bakery-style cookie.
Do Not Skip Dough Chilling
Chilling is not just an optional step.
It improves the cookies in several ways:
- Prevents excessive spreading
- Creates thicker cookies
- Improves flavor
- Hydrates the flour
For the best results:
Minimum:
1 hour
Best:
Overnight
The longer rest allows the flavors to develop.
Measure Flour Correctly
Incorrect flour measurement is one of the biggest reasons cookies fail.
Too much flour:
- Dry cookies
- Dense texture
Too little flour:
- Flat cookies
- Excess spreading
Use the spoon-and-level method for accuracy.
Add Flaky Salt on Top
A small sprinkle of flaky sea salt creates a huge flavor difference.
The salt:
- Balances sweetness
- Enhances chocolate flavor
- Adds a professional bakery finish
Do not add too much.
A small pinch on each cookie is enough.

How to Make Brown Butter Chocolate Chip Cookies Step by Step
Now it’s time for the best part: turning simple ingredients into rich, bakery-style cookies.
Follow these steps carefully, especially when browning the butter and chilling the dough.
Those two techniques are what separate average cookies from unforgettable ones.
Step 1: Brown the Butter
Start by placing the butter into a light-colored saucepan.
Set the heat to medium.
The butter will go through several stages.
First, it will melt completely.
Then:
- It will begin to foam.
- The foam will become lighter.
- The butter will start crackling as the water evaporates.
- Brown specks will begin forming at the bottom.
Keep gently swirling the pan as it cooks.
Do not walk away.
The difference between perfectly browned butter and burnt butter can happen within seconds.
You are looking for:
- Golden-brown milk solids
- A nutty, toasted smell
- A warm caramel-like aroma
Once you see those signs, immediately remove the pan from the heat.
Pour the brown butter into a large heatproof bowl.
Make sure to scrape all those flavorful brown bits from the bottom of the pan.
Those tiny specks contain most of the flavor.
Allow the butter to cool for about 10-15 minutes.
It should still be liquid but not hot enough to cook the eggs.
Step 2: Prepare the Dry Ingredients
While the brown butter cools, prepare your dry ingredients.
In a medium bowl, combine:
- All-purpose flour
- Baking soda
- Salt
Whisk everything together until evenly mixed.
This step ensures the baking soda and salt are distributed throughout the dough.
Set aside.
Step 3: Mix Brown Butter and Sugars
Add the brown sugar and granulated sugar to the cooled brown butter.
Whisk until everything is fully combined.
The mixture will look glossy and slightly thick.
This step is important because the sugars absorb the flavor from the brown butter.
You should already notice the deep caramel aroma developing.
Step 4: Add Eggs and Vanilla
Add the eggs one at a time.
Whisk well after each addition.
Adding eggs slowly helps create a smoother cookie dough.
Once the eggs are incorporated, add:
2 teaspoons vanilla extract
Mix until combined.
The mixture should look smooth and slightly creamy.
Step 5: Combine Wet and Dry Ingredients
Slowly add the flour mixture into the butter mixture.
Use a rubber spatula instead of a mixer at this stage.
Fold gently until the flour is almost completely incorporated.
Stop mixing as soon as you no longer see dry flour.
Overmixing develops too much gluten.
That can create cookies that are:
- Tough
- Dense
- Less tender
The goal is a soft cookie dough.
Step 6: Add Chocolate
Now add your chocolate chips or chopped chocolate.
Fold them evenly throughout the dough.
Make sure the chocolate is distributed from edge to edge.
Every cookie should have plenty of chocolate.
If using chopped chocolate, do not throw away the small chocolate dust and pieces.
Those tiny pieces melt into the dough and create extra chocolate flavor.
Step 7: Chill the Dough
Cover the bowl tightly with plastic wrap.
Place the dough in the refrigerator.
Chill for:
At least 1 hour
For the best flavor:
Overnight
Chilling does several important things.
It:
- Solidifies the butter.
- Prevents cookies from spreading too much.
- Allows flour to fully hydrate.
- Deepens the brown butter flavor.
This waiting period is difficult, but it creates a much better cookie.
Step 8: Prepare for Baking
When ready to bake:
Preheat your oven to:
375°F (190°C)
Line baking sheets with parchment paper.
Using parchment paper helps:
- Prevent sticking.
- Create even baking.
- Make cleanup easier.
Step 9: Scoop the Cookie Dough
Use a cookie scoop or spoon to portion the dough.
Each cookie should be approximately:
2 tablespoons of dough
Place cookie dough balls on the baking sheet.
Leave about:
2-3 inches between cookies
They need space to spread while baking.
Step 10: Bake the Cookies
Bake for:
10-12 minutes
The cookies are ready when:
- The edges are golden brown.
- The centers still look slightly soft.
- The tops are lightly set.
Do not wait until the centers look completely cooked.
They will continue baking on the hot baking sheet after coming out of the oven.
This is how you get that soft, chewy center.
Step 11: Add Flaky Sea Salt
Immediately after removing the cookies from the oven:
Sprinkle a small amount of flaky sea salt on top.
The warm cookies help the salt stick.
The combination of:
- Sweet chocolate
- Nutty butter
- Slight saltiness
creates an incredible flavor balance.
Step 12: Cool Before Serving
Allow cookies to cool on the baking sheet for:
5 minutes
Then transfer them to a cooling rack.
This allows them to finish setting while keeping the centers soft.
If you eat one warm, expect:
- Melted chocolate
- Soft texture
- Gooey center
That first bite is the reward for waiting.
How to Get the Perfect Cookie Texture
Everyone has a different favorite cookie texture.
Some people love thin and crispy cookies.
Others want thick, chewy bakery-style cookies.
This recipe is designed for:
Crispy edges + soft chewy centers
Here is how different factors affect texture.
| Technique | Result |
|---|---|
| More brown sugar | Softer, chewier cookies |
| More granulated sugar | Crispier edges |
| Longer chill time | Thicker cookies with deeper flavor |
| Melted brown butter | Richer flavor and chewier texture |
| Overbaking | Dry, crunchy cookies |
| Underbaking slightly | Soft, gooey centers |
Common Brown Butter Cookie Mistakes
Even experienced bakers can run into problems.
Here are the most common mistakes and how to fix them.
Burning the Butter
This is the biggest brown butter mistake.
Signs of burnt butter:
- Black specks
- Bitter smell
- Smoky flavor
Perfect brown butter should have:
- Golden-brown specks
- Nutty aroma
- Sweet toasted smell
If the butter burns, it cannot be saved.
Start again.
Skipping the Cooling Step
Adding eggs to hot brown butter can cause problems.
The heat can:
- Cook the eggs.
- Create scrambled egg pieces.
- Change the cookie texture.
Always allow the butter to cool before mixing.
Not Chilling the Dough
This is one of the biggest reasons cookies fail.
Without chilling:
- Butter melts too quickly.
- Cookies spread too much.
- Centers become thin.
Cold dough creates thicker, chewier cookies.
Overmixing the Dough
Once flour is added, mix gently.
Overmixing develops gluten.
The result:
- Tough cookies
- Less tender texture
Stop mixing as soon as the flour disappears.
Overbaking Cookies
Many people wait until cookies look completely done.
That is usually too late.
The perfect cookie should look slightly underdone in the center.
The residual heat finishes baking them.
Brown Butter Chocolate Chip Cookie Substitutions and Variations
One of the best parts of chocolate chip cookies is making them your own.
Here are some easy ways to customize this recipe.
| Ingredient | Substitute | Result |
|---|---|---|
| All-purpose flour | Half whole wheat flour | Nutty, heartier flavor |
| Regular flour | 1-to-1 gluten-free baking blend | Gluten-free cookies |
| Semi-sweet chocolate | Dark chocolate | Richer, less sweet flavor |
| Semi-sweet chocolate | Milk chocolate | Sweeter, classic cookie taste |
| Chocolate chips | White chocolate | Creamy sweetness |
| Chocolate chips | Chopped chocolate bars | Bakery-style chocolate pockets |
| Nuts | Walnuts or pecans | Added crunch and toasted flavor |
Mix-In Ideas to Try
Want to make these cookies even more special?
Try adding:
Toasted Walnuts
Walnuts pair beautifully with brown butter.
They add:
- Crunch
- Earthy flavor
- More texture
Pecans
Pecans create a buttery, almost caramel-like flavor combination.
They are especially good when lightly toasted first.
Toffee Bits
Brown butter and toffee are a perfect match.
The extra caramel flavor makes the cookies taste even richer.
Cinnamon
A small amount of cinnamon adds warmth.
Use:
¼ to ½ teaspoon
A little goes a long way.
Different Chocolate Combinations
Try mixing:
- Dark chocolate chunks
- Milk chocolate chips
- White chocolate pieces
A combination of chocolates creates a more interesting cookie.
Make-Ahead Tips
One of the best things about this recipe is that the dough can be prepared ahead.
Refrigerated Cookie Dough
You can store prepared dough in the refrigerator for:
Up to 3 days
In fact, the flavor improves over time.
The longer rest allows:
- Butter flavor to deepen.
- Flour to hydrate.
- Ingredients to blend together.
Before baking:
Let dough sit at room temperature for 10-15 minutes if it is too firm to scoop.
Freezing Cookie Dough
This recipe freezes extremely well.
To freeze:
- Scoop dough into individual cookie portions.
- Place on a baking sheet.
- Freeze until solid.
- Transfer to a freezer bag.
Frozen cookie dough lasts:
Up to 3 months
When ready to bake:
Bake directly from frozen.
Add:
2-3 extra minutes
to the baking time.

Storage and Leftover Tips for Brown Butter Chocolate Chip Cookies
Let’s be honest.
Freshly baked cookies rarely last long.
But if you somehow have leftovers, proper storage is the difference between cookies that stay soft and cookies that become dry and disappointing.
The good news?
These brown butter chocolate chip cookies store beautifully.
The deep flavor from the brown butter actually becomes even better after resting.
How to Store Baked Cookies
Once your cookies have completely cooled:
Place them in an airtight container.
Store them at:
Room temperature
They will stay fresh for:
Up to 5 days
For the best texture:
- Keep them away from air exposure.
- Avoid storing them while still warm.
- Use a container with a tight seal.
Warm cookies trapped in a container create steam, which can make them lose their crisp edges.
The Bread Slice Trick for Softer Cookies
Want your cookies to stay soft longer?
Try this simple trick.
Place a small slice of bread inside the cookie container.
The cookies will absorb moisture from the bread, helping them stay chewy.
The bread may become dry, but the cookies stay soft.
It is a simple bakery trick that works surprisingly well.
How to Freeze Baked Cookies
These cookies freeze extremely well.
To freeze:
- Allow cookies to cool completely.
- Place them in a freezer-safe container.
- Separate layers with parchment paper.
- Seal tightly.
Frozen cookies will stay delicious for:
Up to 3 months
When you want one:
Let it thaw at room temperature.
For a fresh-from-the-oven experience:
Warm it in the microwave for:
10-15 seconds
The chocolate will become soft and melty again.
Freezing Cookie Dough
Freezing the dough is often even better than freezing baked cookies.
Why?
Because you can have fresh cookies anytime.
Prepare the dough:
- Mix the cookie dough completely.
- Scoop into individual portions.
- Freeze dough balls on a baking sheet.
- Transfer frozen dough into a freezer bag.
Storage time:
Up to 3 months
When ready to bake:
Place frozen dough directly on a baking sheet.
Do not thaw completely.
Simply add:
2-3 extra minutes
to the baking time.
This method gives you freshly baked cookies whenever a craving hits.
Nutrition Information
The following nutrition information is an estimate and can vary depending on ingredient brands and cookie size.
Nutrition Facts Per Cookie
| Nutrient | Amount |
|---|---|
| Calories | 250 kcal |
| Carbohydrates | 30g |
| Protein | 3g |
| Fat | 14g |
These cookies are a dessert, so they are meant to be enjoyed as a treat.
However, using quality ingredients and homemade preparation gives you control over exactly what goes into them.
Dietary Substitutions
While traditional chocolate chip cookies contain butter, eggs, and wheat flour, there are several ways to adapt this recipe.
Gluten-Free Brown Butter Chocolate Chip Cookies
To make these cookies gluten-free:
Replace:
All-purpose flour
With:
A quality 1-to-1 gluten-free baking flour blend.
Choose one that contains xanthan gum because it helps recreate the structure that gluten normally provides.
The texture may be slightly different, but you can still achieve:
- Crispy edges
- Soft centers
- Rich chocolate flavor
Dairy-Free Version
For dairy-free cookies:
Replace:
Butter
With:
High-quality vegan butter.
Look for vegan butter that works well for baking.
The browning process may not work exactly like traditional butter because dairy solids create the classic brown butter flavor.
However, you can still create delicious cookies.
Egg-Free Version
Eggs provide:
- Moisture
- Structure
- Binding
To replace eggs, try:
- Commercial egg replacer
- Flax eggs
- Applesauce
Keep in mind the texture may become slightly softer.
Lower Sugar Options
Reducing sugar can affect cookie texture because sugar contributes to:
- Spread
- Moisture
- Crispness
If reducing sugar:
Start by lowering the amount by:
10-20%
Avoid removing too much because the cookies may become dry and less flavorful.
Best Drinks to Serve With Brown Butter Chocolate Chip Cookies
These cookies are rich, nutty, and chocolatey, making them perfect with different drinks.
Classic Pairing: Cold Milk
There is a reason milk and cookies are famous.
The cold milk balances:
- Rich butter flavor
- Sweet chocolate
- Caramel notes
It is the ultimate nostalgic combination.
Coffee Pairing
Brown butter cookies and coffee are an incredible match.
The roasted flavors complement each other.
Try:
- Espresso
- Cappuccino
- Cold brew
- Dark roast coffee
The coffee enhances the nutty notes from the brown butter.
Adult Pairings
For adults, these cookies pair surprisingly well with:
- Stout beer
- Bourbon
- Dessert wine
The caramel and chocolate flavors work beautifully with deeper drinks.
Troubleshooting Brown Butter Chocolate Chip Cookies
If your cookies did not turn out exactly how you wanted, do not worry.
Most cookie problems have simple fixes.
Why Did My Cookies Spread Too Much?
This is one of the most common issues.
Possible reasons:
The Dough Was Too Warm
Brown butter starts as a liquid.
If the dough is not chilled enough, the cookies spread quickly.
Solution:
Chill the dough longer.
Too Little Flour
Incorrect measuring can create thin cookies.
Solution:
Measure flour carefully using the spoon-and-level method.
Butter Was Too Hot
Adding ingredients while butter is still warm can affect the dough.
Solution:
Allow brown butter to cool before mixing.
Why Are My Cookies Too Dry?
Dry cookies usually happen because of:
Too Much Flour
Extra flour absorbs moisture.
Solution:
Measure accurately.
Overbaking
Cookies continue baking after leaving the oven.
Solution:
Remove them when the centers still look slightly soft.
Too Long in the Oven
Even an extra few minutes can change the texture.
Keep a close eye during the final baking minutes.
Why Are My Cookies Too Flat?
Flat cookies usually mean:
- Dough was not chilled enough.
- Butter was too warm.
- Oven temperature was too low.
Solutions:
- Chill dough longer.
- Check oven temperature.
- Bake on cool baking sheets.
Why Does My Brown Butter Taste Bitter?
This usually means the butter burned.
Perfect brown butter should taste:
- Nutty
- Toasty
- Caramel-like
Burnt butter tastes:
- Bitter
- Smoky
- Sharp
Next time:
Remove the butter from heat as soon as the brown specks appear.
Remember, it continues cooking after removal.
Why Are My Cookies Not Chewy?
Chewy cookies require moisture balance.
Possible causes:
- Too much flour
- Too much baking time
- Not enough brown sugar
For chewier cookies:
- Use packed brown sugar.
- Chill dough overnight.
- Slightly underbake the centers.
Frequently Asked Questions
Ca n I Use Salted Butter Instead of Unsalted Butter?
Yes. Salted butter works.However, reduce the added salt slightly.
Instead of:
1 teaspoon salt
Use:
About ½ teaspoon salt
This prevents the cookies from becoming too salty.
Can I Skip Browning the Butter?
Technically yes.
You can make regular chocolate chip cookies using melted or softened butter.
But you will lose the signature flavor.
The brown butter creates:
- Nutty notes
- Toasted aroma
- More complex sweetness
It is the ingredient that makes this recipe special.
How Do I Know When Brown Butter Is Ready?
Look for three signs:
- Golden-brown specks at the bottom.
- Nutty aroma.
- Slight caramel smell.
The butter should not smell burnt.
Can I Use Chocolate Chips Instead of Chopped Chocolate?
Absolutely.
Chocolate chips are convenient and delicious.
However, chopped chocolate creates a more bakery-style result because it melts differently.
You get:
- Chocolate pools
- Small chocolate pieces
- Better distribution
Should I Chill Cookie Dough Overnight?
You do not have to.
One hour is enough.
But overnight chilling creates better flavor.
The dough develops:
- Deeper caramel notes
- Better texture
- More complex flavor
Why Are My Cookies Soft After Baking?
That is actually a good sign.
Fresh cookies are naturally soft.
They continue setting as they cool.
The perfect brown butter cookie should have:
- Slightly crisp edges
- Soft center
- Chewy texture
Can I Double This Recipe?
Yes.
This recipe doubles easily.
When making a larger batch:
- Brown butter carefully.
- Use a larger mixing bowl.
- Avoid overcrowding baking sheets.
You may need several baking rounds.
Final Thoughts: The Chocolate Chip Cookie Upgrade You Need to Try
The difference between an ordinary chocolate chip cookie and an unforgettable one often comes down to one simple technique.
Brown the butter.
That single step transforms basic ingredients into something incredible.
The nutty butter, caramelized sugar, melted chocolate, and flaky salt create a cookie that feels familiar but tastes completely upgraded.
The secrets are simple:
- Brown the butter carefully.
- Use quality chocolate.
- Chill the dough.
- Do not overmix.
- Do not overbake.
These cookies are perfect for:
- Holiday baking
- Family gatherings
- Dessert tables
- Homemade gifts
- Weekend baking projects
Once you make brown butter chocolate chip cookies, regular cookies may never feel the same again.
So grab your butter, heat up that saucepan, and experience what happens when a simple ingredient gets a little extra attention.
These are the cookies people remember.


