
Irresistible Caramel Chocolate Crunch Bars

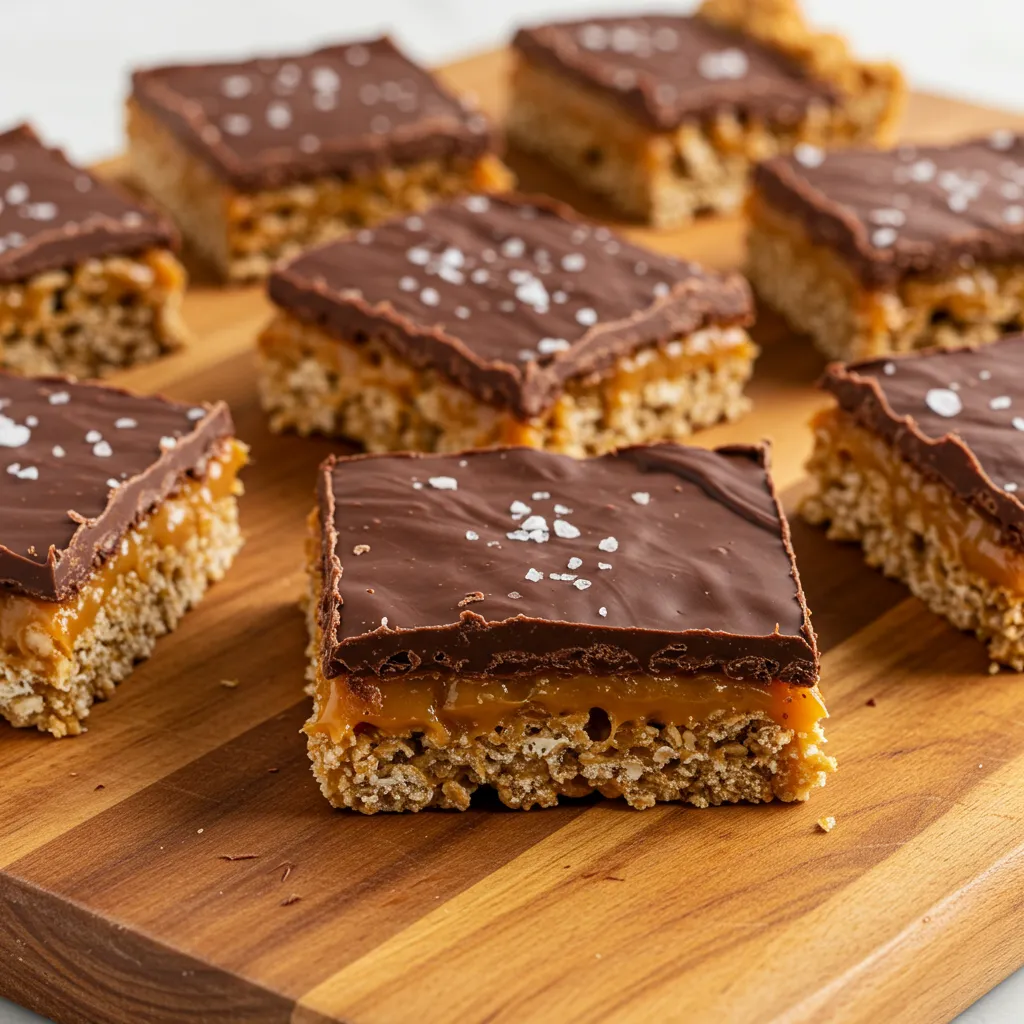
Craving something sweet, crunchy, a little salty, and gooey? These no-bake Caramel Chocolate Crunch Bars deliver all that with layered crunch, a soft caramel center, and a rich chocolate top — no oven required (except optional toasting) and ready in under a few hours with chilling time.
This simple, crowd-pleasing recipe makes dessert bars that are perfect for parties, bake sales, or a summer treat. Printable recipe card and step-by-step instructions are below — try them tonight!
Irresistible Caramel Chocolate Crunch Bars
These caramel crunch bars layer a crunchy base, a soft caramel center, and a luscious chocolate top — an easy, no-fuss recipe that’s as delicious as it sounds. They’re perfect for summer parties, bake sales, or a quick homemade treat everyone will love.
What You’ll Need
Gather everything before you start — it makes the process smoother. This recipe yields about 12–16 bars (depending on how large you cut them). Prep time: 15 minutes (plus chilling); cook time: 10 minutes; total time: ~2½ hours including chill time.
For the Crunchy Base:
- 4 cups crispy rice cereal (about 120 g)
- 1 cup rolled oats (old‑fashioned) (about 90 g) — or toast briefly for extra flavor
- 1/2 cup packed brown sugar (100 g)
- 1/2 cup light corn syrup (120 ml)
- 1/2 cup creamy peanut butter (120 g) — or almond butter/sunflower seed butter (see swaps)
- 1 teaspoon vanilla extract
For the Caramel Layer:
- 1 cup unsalted butter (2 sticks / 226 g)
- 1 cup packed brown sugar (220 g)
- 1 cup light corn syrup (240 ml)
- 1 can (14 ounces / 396 g) sweetened condensed milk
- A pinch of salt
For the Chocolate Top:
- 2 cups semi‑sweet chocolate chips (about 340 g)
- 1 tablespoon coconut oil or vegetable shortening
- Flaky sea salt for sprinkling (optional, but great)
Allergen note: Contains peanuts and dairy (see swaps for gluten‑free or dairy‑free options).
Tools of the Trade
You don’t need any fancy equipment—just basic kitchen tools will do. Have these on hand before you start to make the process quick and tidy.
| Tool | Purpose |
|---|---|
| 9×13 inch baking pan | To build and set the bars. (An 8×8 or 9×9 inch pan works too — the bars will be thicker, so adjust the chilling time accordingly.) |
| Large saucepan | For melting the base ingredients together. |
| Medium saucepan | For preparing the caramel layer. |
| Spatula or wooden spoon | For mixing the ingredients; an offset spatula helps spread each layer evenly. |
| Parchment paper | To line the pan for easy removal and create handles for lifting the finished bars out of the pan. |
The Game Plan: Step-by-Step Instructions
Follow these clear steps — and don’t rush the caramel. Making caramel needs patience and steady stirring for the best texture.
Step 1: Prepare your pan. Line a 9×13 inch pan with parchment paper, leaving some paper hanging over the sides to use as handles later. This prepared pan makes lifting the bars out easy.
Step 2: Make the crunchy base. In a large saucepan over medium heat, combine 1/2 cup packed brown sugar, 1/2 cup light corn syrup, and 1/2 cup creamy peanut butter. Cook, stirring constantly, until everything is melted and smooth.
Step 3: Remove the saucepan from the heat and stir in 1 teaspoon vanilla extract. Add the 4 cups crispy rice cereal and 1 cup rolled oats, folding until the cereal and oats are fully coated with the mixture.
Step 4: Press the coated cereal mixture firmly and evenly into the bottom of your prepared pan. Use the back of a spoon or lightly oiled hands to flatten the layer. Chill in the refrigerator while you make the caramel.
Step 5: Now for making the caramel. In a medium saucepan, melt 1 cup unsalted butter over medium heat. Stir in 1 cup packed brown sugar, 1 cup light corn syrup, 1 can (14 ounces) sweetened condensed milk, and a pinch of salt.
Step 6: Bring the caramel mixture to a boil over medium heat, stirring constantly. Once boiling, reduce the heat to low and simmer for 5–7 minutes, stirring constantly — the mixture should thicken slightly and darken in color. (If you use a candy thermometer, aim for roughly 235–245°F for a soft, chewy caramel.)
Safety note: The caramel is extremely hot. Use oven mitts and be careful when stirring and pouring.
Step 7: Carefully pour the hot caramel over the chilled cereal base and spread it into an even layer. Let it cool on the counter for about 30 minutes so the caramel firms up slightly.
Step 8: Time for the chocolate top. Place 2 cups semi-sweet chocolate chips and 1 tablespoon coconut oil in a microwave-safe bowl. Melt in 30-second bursts, stirring between each burst, until the chocolate is smooth and glossy.
Step 9: Pour the melted chocolate over the cooled caramel layer and spread into a smooth top. Sprinkle flaky sea salt if desired. This chocolate caramel top gives the bars a gorgeous finish.
Step 10: Place the pan in the refrigerator for at least 2 hours to let everything set completely — longer if your fridge is warm. The bars need to be firm before slicing.
Step 11: Once firm, lift the bars from the pan using the parchment handles, place on a cutting board, and cut into squares. For clean slices, warm your knife under hot water, dry it, and then slice each bar.
Pro Tips From My Kitchen
I’ve made these bars dozens of times — here are quick, actionable tips that improve texture and make assembly easier.
- Toast Your Oats: Spread the rolled oats on a baking sheet and toast at 350°F for 5–7 minutes until fragrant for a nuttier base (watch closely so they don’t burn).
- Don’t Scorch the Caramel: Use low, steady heat when making caramel and stir constantly. High heat can burn the sugar and make the caramel bitter — patience pays off.
- Use an Offset Spatula: An offset spatula helps you spread the layers evenly into corners for a clean finish on your crunch bars.
- Warm Your Knife: For clean slices, run your knife under hot water, dry it, and slice — the warm blade glides through the chocolate caramel top without cracking it.
Swaps and Changes
This recipe is flexible — change ingredients to suit allergies or flavor preferences.
| Ingredient | Substitution Idea | Notes |
|---|---|---|
| Peanut Butter | Almond butter, cashew butter, or sunflower seed butter | Almond or cashew butter work well; sunflower seed butter is a good nut-free option but may alter binding slightly. |
| Crispy Rice Cereal | Puffed wheat, corn flakes, or another crunchy cereal | Pick a plain cereal (not too sweet) to keep the balance of flavors in the base. |
| Semi-Sweet Chocolate | Milk chocolate, dark chocolate, or white chocolate chips | Use about 12 oz (340 g) of your preferred chocolate for the top; dark chocolate yields a richer finish. |
Flavor ideas: stir in 1/2 cup chopped peanuts or toasted pecans to the base for extra crunch, or sprinkle flaky sea salt on the chocolate caramel top for a sweet‑salty contrast. Try a dairy‑free swap (vegan butter and dairy‑free condensed milk) to make these bars suitable for vegan diets.
Love experimenting? Tell me which swaps you tried in the comments — I read every one.
Make-Ahead and Storage
These bars are perfect for planning ahead. Store them in an airtight container in the refrigerator (at 40°F/4°C or below) for up to 7 days — keep layers intact and use parchment between layers if stacking.
For longer storage, freeze the bars: cut into squares, arrange in a single layer in a freezer-safe container, and place parchment paper between layers to prevent sticking. Freeze at 0°F (-18°C) for up to 3 months; thaw in the refrigerator for best texture.
Frequently Asked Questions
Q1. My caramel layer is too hard and difficult to chew. What went wrong?
Ans: You probably cooked the caramel too long. Overcooking (or cooking at too high a heat) reduces moisture and yields a firmer set. Stick to the 5–7 minute simmer and watch the mixture — it should thicken but remain pliable.
Q2. Can I use a different size pan?
Ans: Yes. Using an 8×8 or 9×9 pan will make thicker bars; a 9×13 pan yields thinner bars. Changing pan size affects chilling time and final texture, so allow extra refrigerator time for thicker bars.
Q3. Why isn’t my chocolate layer smooth and shiny?
Ans: This often happens if the chocolate gets too hot or if any water touches it. Melt slowly (in short bursts) in a microwave-safe bowl, stir well, and keep utensils dry. Adding the tablespoon of coconut oil helps the chocolate top stay glossy.
Q4. Can I add other things to the base?
Ans: Absolutely. Mix in chopped nuts, seeds, or mini chocolate chips for extra crunch and flavor. Sprinkle flaky sea salt on the chocolate top for a sweet‑and‑salty finish.
Wrapping Up
There you have it — a simple, make-ahead recipe for truly irresistible Caramel Chocolate Crunch Bars. These bars deliver crunchy, gooey, chocolatey goodness and are perfect for parties, bake sales, or a relaxed summer treat.
Give this recipe a try and share how yours turn out: leave a comment, upload a photo of your caramel crunch bars, and let me know which swaps you tested (peanut butter alternatives or extra salt on top are favorites).


