
Red Velvet Cheesecake Brownies (Fudgy, Tangy, Marbled)

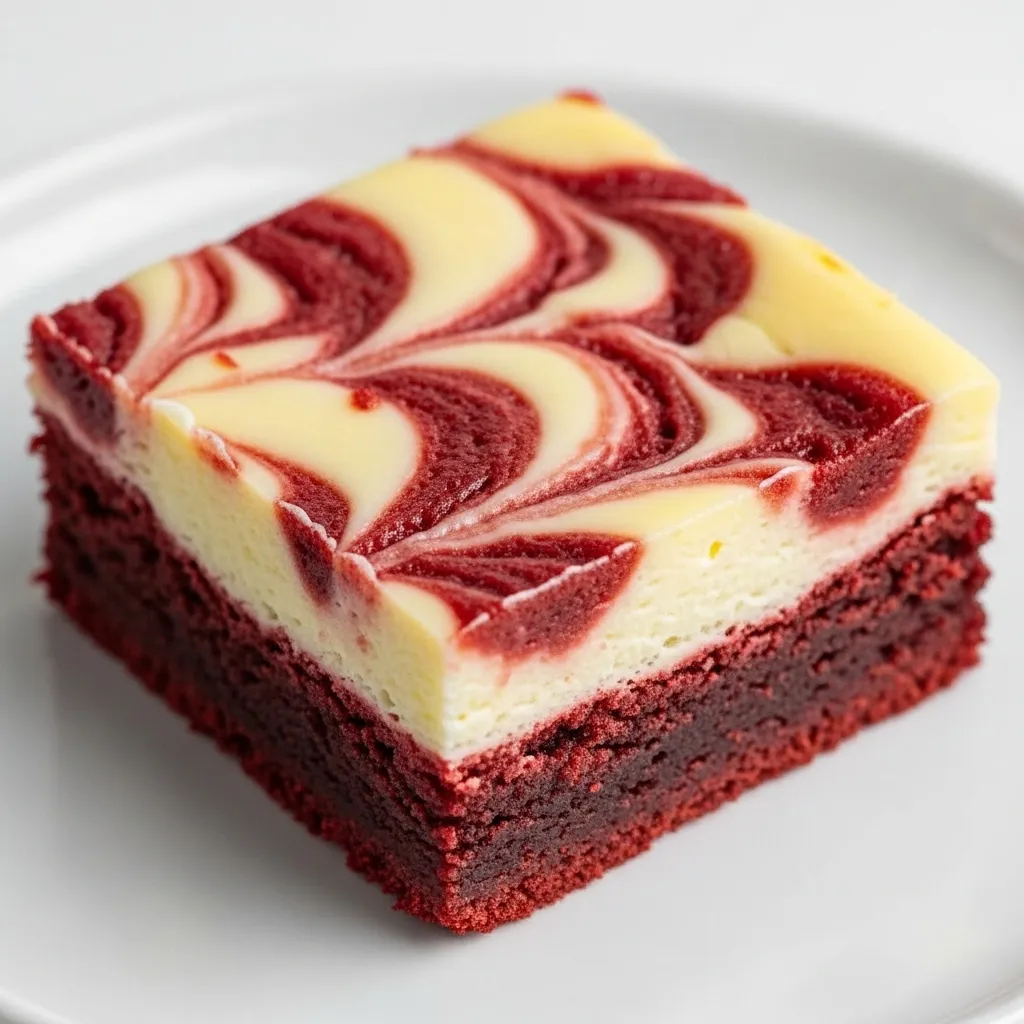
The contrast is what gets you. Deep red, fudgy brownie, marbled with ribbons of tangy white cheesecake. They look like something you’d pay six dollars for behind glass at a fancy cafe.
Red velvet cheesecake brownies are exactly what they sound like, and somehow even better. You get the soft, cocoa-kissed chew of red velvet on the bottom, a swirl of cream cheese on top, and that gorgeous marbled finish that makes everyone assume you’re a much more serious baker than you are.
The whole thing comes together in one pan, with no mixer required if you don’t feel like dragging one out.
Why You’ll Love This Recipe
I’ve tweaked the ratios on these more than once to get the fudge-to-cheesecake balance right. Here’s where it landed and why you’ll keep coming back:
- Two textures, one bite. Dense, fudgy brownie meets cool, tangy cheesecake. The contrast is the whole point.
- That marbled top is a showstopper. It takes seconds to create and looks like a bakery made it.
- No mixer needed. A whisk and a bowl handle the brownie base. Easy cleanup.
- They travel well. Cut into squares, they’re the perfect thing to bring somewhere and watch disappear.
- The color does the heavy lifting. Red velvet just looks special, so these feel like a celebration with very little effort.
What You’ll Need

This makes one 8×8-inch pan, about 16 squares.
For the red velvet brownie base:
- 1/2 cup (113g) unsalted butter, melted
- 1 cup (200g) granulated sugar
- 2 large eggs
- 1 teaspoon vanilla extract
- 2 tablespoons unsweetened cocoa powder
- 1 tablespoon red food coloring (gel or liquid)
- 1 teaspoon white vinegar
- 3/4 cup (94g) all-purpose flour
- 1/4 teaspoon salt
For the cheesecake swirl:
- 8 oz (225g) cream cheese, room temperature
- 1/4 cup (50g) granulated sugar
- 1 large egg yolk
- 1/2 teaspoon vanilla extract
That little splash of vinegar is not a typo. It’s classic red velvet, and it reacts with the cocoa to deepen the color and add the faint tang that makes red velvet taste like red velvet, not just dyed chocolate.
Room-temperature cream cheese matters again here. Cold cream cheese stays lumpy and won’t swirl smoothly.
Pro Tips
These small things make the difference between good and bakery-good.
- Use gel food coloring if you can. Gel gives a richer red with less liquid, which keeps your brownie base from turning cakey. Liquid works, just use the full tablespoon.
- Don’t skip the vinegar. It’s the secret behind real red velvet flavor and that vivid color. You won’t taste it as vinegar, promise.
- Beat the cheesecake layer until truly smooth. Lumps in the cream cheese will show up as bumps in your swirl. Whisk or beat until silky before adding the yolk.
- Swirl gently, don’t blend. A few clean passes with a knife gives you defined marbling. Overdoing it muddies the two colors into one murky shade.
- Underbake slightly for fudgy centers. Pull them when a toothpick comes out with a few moist crumbs, not clean. They keep setting as they cool.
Tools You’ll Need
- 8×8-inch baking pan
- Parchment paper
- Two mixing bowls
- Whisk
- Electric mixer or hand whisk for the cheesecake layer
- Rubber spatula
- Butter knife or skewer for swirling
- Measuring cups and spoons
Substitutions and Variations
A few fun directions to take these.
- Natural color. Skip artificial dye and use 2 to 3 tablespoons of beet powder for a softer, earthier red.
- Extra chocolate. Fold a handful of white or dark chocolate chips into the brownie batter.
- Cocoa boost. For a more chocolate-forward base, bump the cocoa to 3 tablespoons and add a tablespoon of flour to balance.
- 9×9 pan. Works fine for thinner squares. Reduce the bake time by about 5 minutes.
- Gluten-free. A 1:1 gluten-free baking flour swaps in cleanly for the all-purpose.
- Mini version. Bake in a lined muffin tin for individual portions, around 18 to 20 minutes.
Make Ahead Tips
These are great for planning ahead.
The baked, cooled brownies keep beautifully in the fridge for up to 5 days, and many people think they taste even better chilled the next day, when the cheesecake firms up.
They also freeze well for up to 3 months. Cut into squares, wrap individually, and stash them. Thaw at room temperature for about 30 minutes before serving.
You can also measure out your dry ingredients and bring the cream cheese to room temperature ahead of time so assembly is quick.
How to Make Red Velvet Cheesecake Brownies
Keep an eye on the bake time near the end. Fudgy is the goal, not dry.
- Prep the pan. Preheat to 350°F (175°C). Line the 8×8 pan with parchment, leaving an overhang so you can lift the brownies out later.
- Mix the wet base. In a bowl, whisk the melted butter and sugar. Add the eggs, vanilla, cocoa powder, red food coloring, and vinegar. Whisk until smooth and deeply red.
- Add the dry. Stir in the flour and salt just until no dry streaks remain. Don’t overmix.
- Layer it. Pour most of the red velvet batter into the pan, smoothing it level. Reserve about 1/4 cup for the marbling on top.
- Make the cheesecake swirl. Beat the cream cheese and sugar until smooth, then mix in the egg yolk and vanilla.
- Top and dot. Spoon the cheesecake mixture over the brownie base in dollops. Drop small spoonfuls of the reserved red batter on top of and around the cheesecake.
- Swirl. Drag a knife or skewer through the layers in a few figure-eight motions to marble. Stop while you can still see distinct red and white.
- Bake and cool. Bake 30 to 35 minutes, until the edges are set and a toothpick in the center comes out with a few moist crumbs. Cool completely in the pan, then chill for an hour before slicing for the cleanest squares.
A Few Extra Details
A rough nutrition snapshot. These are an indulgent treat. Estimate per square, cut into 16:
| Per square (approx.) | Amount |
|---|---|
| Calories | 195 |
| Carbohydrates | 22g |
| Sugars | 16g |
| Fat | 11g |
| Protein | 3g |
Numbers vary with square size and brand of ingredients.
Diet-friendly swaps. For gluten-free, use a 1:1 gluten-free flour blend. For a slightly lighter square, Neufchatel works in the cheesecake layer, though it bakes a touch softer.
What to serve with them. A glass of cold milk is the classic move. For something fancier, a scoop of vanilla ice cream next to a slightly warm square turns these into a plated dessert.
Time-saver. Melt the butter in the same bowl you’ll mix the base in, and you’ve got one less dish. Line the pan with parchment so cleanup is just lifting and slicing.
Nailing the Marble
The marble is mostly about contrast and restraint. You want the red batter and the white cheesecake to stay visibly separate, with just enough mixing to make them dance.
Drop the cheesecake in fat dollops rather than spreading it. Spreading it thin makes the swirl muddy and pink.
Then add the reserved red batter in small dots on top of and between those white pools. When you drag your knife through, move slowly in long figure-eights and lift the knife between passes. Three or four passes is plenty.
The biggest mistake is over-swirling out of nervousness. Stop sooner than you think. A bolder, blockier marble always photographs and tastes better than a blended pink blur.
Leftovers and Storage
Because of the cream cheese, store these in an airtight container in the fridge for up to 5 days. They firm up nicely when cold and slice cleaner straight from the fridge.
To freeze, wrap individual squares and keep them for up to 3 months. Thaw on the counter for half an hour, or eat them slightly frozen if you like a firmer, fudgier bite.
Leave them out at room temperature for serving, but not for hours, since the cheesecake layer is dairy-based.
FAQ
Can I leave out the food coloring? You can, and the brownies will taste the same, just brown instead of red. For a natural red, beet powder is a good option.
Why is the vinegar in there? It’s traditional in red velvet. It reacts with the cocoa and baking ingredients to brighten the color and add a subtle tang. You won’t taste vinegar in the finished bars.
How do I get clean square cuts? Chill the brownies first, then slice with a sharp knife, wiping the blade clean between cuts. Warm, gooey brownies tear instead of slicing.
My swirl turned into one color. What went wrong? You likely swirled too many times. A few passes is enough. Once the red and white start blending into pink, you’ve gone too far.
Can I double the recipe? Yes, use a 9×13 pan and add about 8 to 10 minutes to the bake time, checking the center for those moist crumbs.
Wrapping Up
These are the brownies that make people think you have a secret pastry diploma tucked away somewhere.
The red velvet base is fudgy and just a little tangy. The cheesecake swirl is cool and creamy. And that marbled top turns a simple one-pan bake into something that looks like a celebration.
Bake a pan this week, especially if you’ve got something to celebrate or someone to spoil. Then come back and tell me in the comments how they turned out, if you went bold red or natural, and drop any questions. I love hearing how yours came out.


